I’m not overly fussed on detaching the loco from the tender, most of my locos have already got a driving crew fitted anyway. I’ve checked out my sound options and spoken to Olivias Trains who specialise in DCC sound. They also seem to have a wide range of loco sounds, luckily they’ve got sounds for most of my locos. Just waiting on an email reply.
https://www.oliviastrains.com/trains/mt/dcc-chip-sound/
I do have another problem though, with a flashing screen on my controller and locos stopping as they enter the peck bullhead points. If they’re travelling in the direction towards where the point forks out, they stop. In the pictures below, you can see the the loco was travelling forward at a slow speed and when it stopped, I received the message on the controller. I’ve read the manual for it, and it doesn’t explain what’s happening. I’m not sure why this is happening, but the entire point is live which could be the cause?
Shelf Layout
Re: Shelf Layout
SVdA is the PA or PE going into short circuit protection mode and removing track power all the while the short circuit is present.
Are you running into the point with it set to the opposite direction? The locos wheels then bridge the IRJs (Insulated Rail Joiners) or gaps in the Vee rails and connect a positive rail to a negative one - result Short circuit.
The other cause of a short can be that the metal loco wheels are able to bridge between the points open switch rail inside face and the fixed adjacent stock rail. On DC this would just produce a spark but DCC has exceptionally fast overload cut outs hence the PA/PE SVdA display.
Re: Shelf Layout
Yes, firstly check the Back 2 Back distance of all wheels on the loco. Suitable B2B gauges are sold by good model shops or available direct from suppliers like... The Double O Gauge Association http://www.doubleogauge.com/shop.htm You will need their Intermediate Standard gauge B2B is 14.4mm to 14.5mm +/- 0.05mm The gauge should be an interference fit in between each set of wheels.
To modify the points, you need to remove the factory link wires that connect the frog to the closure rails and out to the switch rails. Then ensure each closure rail is bonded to its adjacent stock rail. Of course all this must have frog polarity switching employed, if its not already fitted. I assume Insulated Rail Joiners are already fitted to the points Vee rail ends?
Re: Shelf Layout
I’m going to wait until the end of this week until I purchase the back to back gauge. The point isn’t insulated as it’s bullhead rail, which peco don’t do insulated rail joiners for. The idea behind the bullhead is to allow for easier DCC running. As someone new to DCC, rewiring points without really understanding what I’m doing is a little daunting, and they’re expensive to replace.
Re: Shelf Layout
Well hello everyone!
So it seems I have returned after months of inactivity. I can’t say much has changed, but I have taken up the task of fitting decoders to most of my locos, and it was a challenge!
All my locos in which the chip fits in the tender were a dream, and my little pannier was incredibly easy to install a chip in to.
However, my locos where it goes into the loco was a different story, they were all Bachmann locos- the B1, 4mt and the modified hall. It seems they weren’t designed to support the decoders they require. Either that, or the decoders themselves weren’t made with consideration to the models which need them. It’s a little baffling why they didn’t install a wire, going from loco to tender on those.
I also no longer have the short circuit issue on the bullhead points, don’t know how, but the problem seems to fix itself. As a bonus, I’ve had to do minimal wiring as the bullhead points makes the whole layout live, plus it’s only a small layout so no dropper cables are needed.
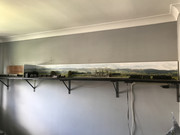
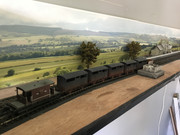
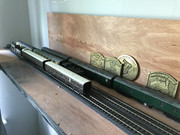
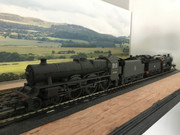
Anyway, I’ve attached some pics below, minor differences from last time, I’ve extended the freight siding by an inch to get a better clearance at the points. I’ve also included a full length photo.


Who is online
Users browsing this forum: No registered users and 2 guests
