On your marks, get set.....

A place to show what you are building, altering, kit bashing etc.
Maria
Posts: 16
Joined: Mon Dec 21, 2020 1:50 pm
Contact:

Re: On your marks, get set.....

#11

Post by Maria »

Walkingthedog wrote: Wed Dec 30, 2020 10:39 pm One of the secrets of joing track is to do it on a flat surface, not waving it about in the air.

It really isn’t difficult, just take your time. :)

When you said Pico did you mean Peco or Piko. In my view Peco is the very best.
Yes, my apologies, Peco!

And yes, on a flat surface against a hard perpendicular “stop”, then tapping the opposite end with a small hammer.

The connectors are incredibly flat, so it’s very fiddly to get the edge of the track into the non-exisant gap 🙄😂, perhaps I’m being a bit too picky - I have very small hands & do lots of craft so I’m fairly dexterous, but these connectors nearly beat me! 😂
User avatar
darkscot
Posts: 413
Joined: Thu Sep 03, 2020 9:03 am
Location: West Yorkshire
Contact:

Re: On your marks, get set.....

#12

Post by darkscot »

I don’t think a hammer should be required? 🤔
Modelling post war LMS. DCC control via Roco z21 & multiMAUS
Puddles
Posts: 305
Joined: Sun Oct 14, 2018 12:00 pm
Location: West Sussex
Contact:

Re: On your marks, get set.....

#13

Post by Puddles »

Tapping the end of the rail with a hammer may be causing a small burr which will prevent the smooth sliding on of the next rail joiner,there is not a lot of tolerance between rail and joiner, just a gentle push together is all that’s needed on a flat surface as WTD advised, Joining track together does seem a bit tricky at first but like most things you will find the knack of doing it.

Puddles
It does not take me long to do five minutes work.
Nostalgia is not what it used to be.
User avatar
Walkingthedog
Posts: 4937
Joined: Thu Oct 04, 2018 5:51 pm
Location: HAZLEMERE, BUCKS.
Contact:

Re: On your marks, get set.....

#14

Post by Walkingthedog »

As Darkscot and Puddles said what ever you do don’t tap the end of the rails with a hammer. That just makes things worse. No wonder you are having problems.
Nurse, the screens!
User avatar
Brian
Posts: 2177
Joined: Thu Oct 04, 2018 3:49 pm
Location: SE Kent
Contact:

Re: On your marks, get set.....

#15

Post by Brian »

To cut and join Peco Streamline track ideally use a Xuron top to bottom rail cutter as it makes the job very easy! If you don't have one, then use a razor saw or a metal slitting disc in a Dremel style mini drill. Once the rail has been cut by whatever method, use a flat needle file to remove any cutting burrs on the rails foot on the underside and the foots top edges both inside and outside of the rail. Then slide on the joiner.
A simple tool made from a scrap piece of rail to help fitting the joiners is shown here... viewtopic.php?f=7&t=3420
Don't forget with Streamline you need to remove the rail chairs on the first sleeper each side of the joint to allow the joiner to slide on, or remove the whole first sleeper each side and trim off its two chairs and refit them as a cosmetic sleeper later on.
DO NOT use a Hammer! :o
Image << Click the Icon to go to my website
GeoffAlan2
Posts: 89
Joined: Sat Oct 06, 2018 1:57 pm
Contact:

Re: On your marks, get set.....

#16

Post by GeoffAlan2 »

teedoubleudee wrote: Mon Dec 28, 2020 6:41 pm
Maria wrote: Mon Dec 28, 2020 3:34 pm
teedoubleudee wrote: Mon Dec 28, 2020 3:27 pm And now the fun begins :D
Do you mean arguing? 🤣🤣🤣
Ha ha, I'm not so sure about that, most of us on here do our modelling as a solitary pursuit.Though I do admit to a lot of talking to myself, whether it be congratulating myself when I've completed something well or calling myself a silly a**e when I've done something stupid (a common occurence!).

Whichever it is there is still a lot of fun to be had with the hobby.
Yes I seem to remember not speaking to myself for a month over the failed Fleischmann curved point that I told myself would be a right beggar to replace if I put it there. It dully failed in 2012!
Bandit Mick
Posts: 908
Joined: Thu Oct 04, 2018 7:42 pm
Contact:

Re: On your marks, get set.....

#17

Post by Bandit Mick »

Sound advice from Brian - makes the job a whole lot easier.
User avatar
andruec
Posts: 146
Joined: Sun Nov 15, 2020 11:01 am
Location: South Northants
Contact:

Re: On your marks, get set.....

#18

Post by andruec »

Maria wrote: Wed Dec 30, 2020 10:33 pm So here we are a few days on from completing the baseboard...

And if I ever have to connect another piece of track ever again, I think I might need to go and live in a chocolate factory & have a wine tanker deliver every day....😳😂😂😂
I know what you mean. This morning while taking a short break from work I was looking at my layout and noticed one of the joints wasn't in both fishplates. How I missed that I don't know because it's on one of the first sections I've laid. I've pushed my test wagon across it dozens of times, run my fingers over it and even run a couple of live locos over it. It's been glued down for a week. Luckily it was a single stretch of streamline and came up fairly easily but of course despite my best attempts the other end also came out. So now I had four fishplates to get right and when you're 'splicing' into place it's even more tricky. I managed it eventually after a heated discussion with myself :)

But if there's one thing that might put me off n gauge in the future it's *censored* fishplates.
Last edited by andruec on Thu Dec 31, 2020 5:14 pm, edited 2 times in total.
User avatar
andruec
Posts: 146
Joined: Sun Nov 15, 2020 11:01 am
Location: South Northants
Contact:

Re: On your marks, get set.....

#19

Post by andruec »

Puddles wrote: Thu Dec 31, 2020 8:58 am Tapping the end of the rail with a hammer may be causing a small burr which will prevent the smooth sliding on of the next rail joiner,there is not a lot of tolerance between rail and joiner, just a gentle push together is all that’s needed on a flat surface as WTD advised, Joining track together does seem a bit tricky at first but like most things you will find the knack of doing it.

Puddles
I found it was easier when I stopped trying to use my glasses and used a magnifying visor. It's so much easier when you can actually see what you're doing :)
Maria
Posts: 16
Joined: Mon Dec 21, 2020 1:50 pm
Contact:

Re: On your marks, get set.....

#20

Post by Maria »

Hello again everyone, sorry - back to work now so time is a little limited.

Many thanks for the advice about the connectors - I actually got the man in the shop in Poole to show me exactly how to connect the tracks and by his own admission, the Peco connectors were exceptionally tight.

He happily tapped them with a hammer to get them in and said he does this from time to time, especially if the connectors are as tight as the ones we have (although he did mention that some brands were more 'forgiving' than others, but sadly, that brand wasn't available due to covid)

We have been spending a little bit of time every day and have so far achieved the following :

Cork is down on half the board, track is now fixed with track pins, some buffers in place.

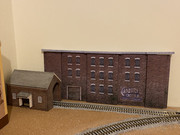
More thoughts on landscaping - his Lordship informed me that I could make models.... :shock: so, not wanting to disappoint I thought I'd try my hand at creating a 'background' firstly, just to see how I cope with it... :lol:

So I've started 'building' some scenery. I lucky as photography is my main hobby so I've been using Photoshop regularly for composited images for a good few years, which does help to make life easier, and I'm always happiest when I'm creating things (which leaves his Lordship free to faff with tracks, trains, ideas etc :lol: )
My inspiration (apart from his Lordships directive) was a bit of warehousing, so I have foam board, photoshop, a printer, glue, double sided tape and a bit of imagination ;) and got creating... a few pics below

Gravelling has also commenced (OMG, who's idea was that?!?!??!) and any suggestions gratefully received about how to deal with the areas that have points...

And I'd be delighted to hear any pointers, advice and suggestions :D


Image

Image

Image

Image

Image

Image

Image
Post Reply

Who is online

Users browsing this forum: No registered users and 1 guest