
Hi. I have to create an embankment for an inclined section of track. I've got some polystyrene sheets so I was thinking I'd stack strips of polystyrene to create a stepped oversize embankment then use a hot wire cutter to trim it down to the final shape. Then put some plaster sheet over the top.
What should the profile of the embankment be? Would it look weird if the resultant embankment was a triangle - ie;the external slope is just a straight line? Or should I try and add a little waviness to it? Or..maybe that can be adjusted during the laying of grass/bushes etc?
One side should appear to be somewhat manicured while the other should look like it's been piled up but the builders couldn't be bothered to remove stones or lay turf. For the rough side I was thinking of gouging a few holes out of the polystyrene after I've shaped it and pushing the plaster in to make it rough. Do you think that would work?
Embankments..
Re: Embankments..
Hi Andruec,
I walk along a long dissed track at a place called Longslade, and despite being in the middle of the countryside, I’m always struck about how flat & regular the sides are.
The only fluctuations visible are its relative height to the surrounding ground - sometimes its only a few feet high, and often much much higher (25 feet I would guess?)
So the only curves and undulations are in the natural landscape and not the embankment itself.
But there are little tunnels occasionally and sometimes it has a gully at the edge running parallel with where the track would have been.
Hope this helps.
Re: Embankments..
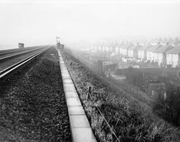
This picture may help, Here about the embankment is higher than the roofs of houses nearby, about 20 - 25 feet above the surrounding land . The surrounding area is clay over chalk, and the embankment was constructed from material excavated from cuttings through hills about two miles distant.
LC&DR says South for Sunshine
-
Tricky Dicky
- Posts: 417
- Joined: Fri Oct 05, 2018 6:49 pm
- Contact:
Re: Embankments..
I got to agree that the profile of embankments is quite regular although trees and vegetation can make them look uneven.
Where I lived before there was a heavy rail line that was converted to the Metrolink. Near a supermarket they created a new station there already was an access road from a nearby road alongside the embankment but that was widened. This involved cutting into the existing embankment and shoring up with concrete gabions I was expecting a neatly layered and even sized material but the innards of the embankment consisted of blocks, bricks and all sorts of discarded building material basically anything that filled a space.
Richard
Re: Embankments..
A bit of nostalgia reading this thread...
I remember train journeys as a child, specifically from south London where I grew up to Brighton, a line that ran through some very deep gorges. Considering that these must have been dug in the days when picks, shovels, and wheelbarrows were the norm, it is staggering how neat they made the sides. Very straight indeed if my memory serves me. Staggering enough that they managed to do it at all, but even more so with a "let's make a nice neat jobs of the sides, eh chaps?" approach added into the workload.
I remember train journeys as a child, specifically from south London where I grew up to Brighton, a line that ran through some very deep gorges. Considering that these must have been dug in the days when picks, shovels, and wheelbarrows were the norm, it is staggering how neat they made the sides. Very straight indeed if my memory serves me. Staggering enough that they managed to do it at all, but even more so with a "let's make a nice neat jobs of the sides, eh chaps?" approach added into the workload.
Re: Embankments..
Thanks to everyone. I've started shaping the embankment it's going well. I've tried several methods so far and my experience is:
* Hot wire cutter. I thought I could just mark the back edge of the polystyrene stack then drag the cutter (a thin rod attachment) along keeping the far end at the bottom of the slope and following the mark for the back edge. It was quick with minimal mess but surprisingly difficult to get the angle and height correct. So much so that I've had to re-purpose one of my attempts for a lower section of the incline. The problem might be that the rod is too thick and has melted below the intended surface.
* Use a rough wood file (like a cheese grater). You have to make sure the PVA has dried in the polystyrene stack and it makes a mess but the result is pretty good. In fact it's a shame I'm making the embankment smooth because it's a great way to make undulations.
* Using a craft knife. As much mess as the file, risk of injury and frankly more hassle than the file.
* Just cut some polystyrene, lean against the incline and modroc over the top. This seems to be the simplest easiest and quickest.
-
Tricky Dicky
- Posts: 417
- Joined: Fri Oct 05, 2018 6:49 pm
- Contact:
Re: Embankments..
A rod for a Hotwire cutter? 
A simple Hotwire cutter can be made with a piece of ply cut into a C shape, two screws put into the ends of the C. Then using Nichrome wire twist the ends round the screws and twist them to tension the wire, it helps if you can drill holes in the end of the screws to pass the wire through, also leave a little extra at the ends to connect your wires to the power supply. Using a couple of terminal strip connectors connect some reasonably thick wires 24/0.2 should be adequate to each end of the Nichrome wire and connect to your power supply. The voltage will depend on the length and thickness of the Nichrome and will need experimenting with, I have used some ex school power packs with a variable voltage and capable of 1A and have never gone above 4-6V, you do not need have the wire glowing red.
To cut neat profiles in polystyrene use two ply templates fixed to both sides and simply run the wire along the templates.
Incidentally, the ex school power pack I acquired was from a Science teacher friend who had to dispose of them because the mains plugs were not shrouded and neither he nor his technicians were allowed to replace them. To get an electrician in to do it was more expensive than replacing with new.
Richard

Re: Embankments..
Some rules are silly! As a student I taught a little science when training to be a maths teacher. Part of one lesson was how to wire a plug. Your friend will have taught the same thing at some point.Tricky Dicky wrote: ↑Sun Jan 10, 2021 5:17 pm Incidentally, the ex school power pack I acquired was from a Science teacher friend who had to dispose of them because the mains plugs were not shrouded and neither he nor his technicians were allowed to replace them. To get an electrician in to do it was more expensive than replacing with new.
Richard
So, he and I are allowed to teach how to wire a plug but not allowed to wire a plug! Madness!
Who is online
Users browsing this forum: No registered users and 12 guests