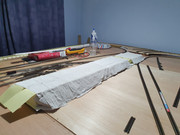
Thought I'd create a thread here as it's no longer a general query. The main body of the incline is a Woodland Scenics 2%. There is a gap at either end for an easement which will also be some kind of diorama. A little enclosed scene that I hope will add some interest to the layout for those looking closely. There's also a gap near the beginning because:
a) I'm using the first half of the incline elsewhere.
b) I want a road bridge underneath.
On the top and sides of the WS incline I've glued strips of paper. The incline is glued to the cut open pieces of the WS box. Together these give enough rigidity to allow me to move the incline around so that I don't have to work with it in situ. It will eventually sit along the middle of my baseboard some half a metre from the edge so working on it there would be awkward. The idea is to do as much work on it 'offline' as possible.
The embanked sides are created in one of two ways.
* The first half was polystyrene chunks leaning against the incline. Originally it was going to be built up of polystyrene strips but that didn't work so I repurposed the strips.
* The second half is cardboard triangles with a strip of card along their leading edge.
In both cases Modrock is then draped over the incline to form the underlying shape. This picture shows what I've got done so far:
https://photos.app.goo.gl/pkxR3fokgLMwgQqh8
Once I've got the shape completed the side nearest the camera will get a grass mat and maybe a few bushes. The side furthest will get some pet bird sandpaper then sand/gravel effect scatter.
After that I don't know. That gets complicated. At some point I have to construct the top elevated section of my layout that this incline is leading to. That's tricky because it sits over the top of some of my track so positioning and cutting needs care. I also have to work out how I'm going to run two sets of track up the incline both of which are about half a metre from the baseboard edge.
Building an incline
- Walkingthedog
- Posts: 4978
- Joined: Thu Oct 04, 2018 5:51 pm
- Location: HAZLEMERE, BUCKS.
- Contact:
Re: Building an incline
Try and wipe the plaster bandages so the holes disappear.
Nurse, the screens!
Re: Building an incline
Ah! That's what's supposed to happen. Thanks.
Luckily most of the bandages will be covered so the holes will be hidden but I'm guessing that the bandages will be that bit stronger if I do that.
Luckily most of the bandages will be covered so the holes will be hidden but I'm guessing that the bandages will be that bit stronger if I do that.
Re: Building an incline
Yes, because you're then spreading the softened plaster within the bandage.
After the bandage has full cured - usually 24/48 hours but is very dependant on the room it is in. I paint the whole surface with suitable acrylic paint, though emulsion can also be used. Generally Burnt Umber for soil. Allow to fully dry then coat in PVA and apply an assortment of scatters. You can even over coat the first layer of scatter with more PVA and add more but in a different colour scatter.
After the bandage has full cured - usually 24/48 hours but is very dependant on the room it is in. I paint the whole surface with suitable acrylic paint, though emulsion can also be used. Generally Burnt Umber for soil. Allow to fully dry then coat in PVA and apply an assortment of scatters. You can even over coat the first layer of scatter with more PVA and add more but in a different colour scatter.
- Walkingthedog
- Posts: 4978
- Joined: Thu Oct 04, 2018 5:51 pm
- Location: HAZLEMERE, BUCKS.
- Contact:
Re: Building an incline
I always wear a thin rubber glove (optional) and smooth the plaster particularly the edges so they blend into the ground.
Nurse, the screens!
Re: Building an incline
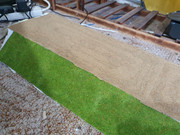
I've completed the embankment shape now and just in time everything else has arrived. So this weekend I will fix the grass mat (it actually looks rather good despite what people say about them). I've also got the sandpaper but this raises a question. The grass mat is just long enough that it can do the long section of embankment side without needing a join. However the sandpaper will not. This means I will have to do something to disguise at least one join. I am intending to drop 'some' gravel scatter on it but I was wondering how else I could disguise the point where two sheets meet.
I did think about a set of steps with a rail (gated access for workers) but I don't know how practical that is.
I think I'm probably going to do both one side and also the top of the embankment with the sandpaper (just folding it up and over to avoid a join). Eventually there will be ballast and a concrete pavement on top which will disguise the join between sandpaper and grass mat.
If you've never seen bird cage sandpaper it's exactly what the name suggests and the substrate is thin card.
Re: Building an incline
Thought I'd put it into position and see how it looked. There appears to be a slight problem at the start of the incline. Not sure how I overlooked that. Looks like I'll have to have a wall. Brick? Concrete? Stone? What would railway engineers do that would look attractive?

Anyway tomorrow I lay grass on this side of the embankment and gravel on the other and the top.

Anyway tomorrow I lay grass on this side of the embankment and gravel on the other and the top.
Re: Building an incline
So I've glued the sandpaper on (only on top at present, will do the side later. Also glued the grass mat. It's looking pretty reasonable already. I will have to disguise the top edge (bought some lichen for that). It's also ended up more 'rippled' than I first thought but I think it makes it look natural.
One thing I need to deal with though is that the grit is glued onto the paper using water soluble adhesive so a couple of places where I used too much PVA the grit has come off. Should be easy enough to repair but I think I should spray some fixing glue on it to protect it.

One thing I need to deal with though is that the grit is glued onto the paper using water soluble adhesive so a couple of places where I used too much PVA the grit has come off. Should be easy enough to repair but I think I should spray some fixing glue on it to protect it.

Who is online
Users browsing this forum: No registered users and 0 guests
