So what happened next. Well my replacement cylinder parts turned up and I then ignored the instructions. I soldered the cylinders to the chassis; that's the chassis that I had painted black as per the instructions. I had to file off the black paint to get the solder to take. Another lesson learn't. I then positioned the slide bars onto the motion bracket and soldered them in the correct position relative to the cylinders. I then completed the cylinders. Next the crossheads (pistons to me, but what do I know?) were installed, nobody told me they were too long and had to be cut to length but it wasn't a big deal, just confused me for a while. Then the Connecting rods were installed. The pivot onto the crosshead is an M1 bolt. I soldered the bolt to the con rod and I'm glad I did. It made assembly easier and didn't cause any problems.
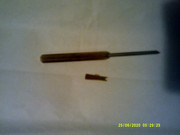
Then it was onto the valve gear, now, I had decided that if this was as difficult as it looked I could always run the loco without valve gear, not exactly correct but my first Tri-and train, 1959 vintage, set a precedent. In fact it has gone OK so far except the crank rod that is soldered to the end of the crank pin on the third axle keeps coming off I keep resoldering it. I think it is handling the loco that does the damage not running it. Anyway, onto the assembly of the valve gear. It was very fiddly, the moving parts are riveted together. Sounded like a recipe for disaster to me so I inserted a piece of paper between the parts before riveting them. See photo

This shows the rivet sticking up through the part to be connected though you may have to take my word for it. I then placed a piece of paper over the rivet to act as a spacer. I tried using a piece with a hole punched in it but 2mm was my smallest punch and it didn't work so I just cut a slot and that worked fine.

I then placed the second part over the rivet and hammered over the end, not too hard. Picked up the completed job and it fell apart. Reassembled it and hammered the rivet a bit more. This time it stayed together but seemed very loose, tap tap, pick it up, tap tap, pick it up repeat until it seems a little stiff. Remove the paper and it is free to turn but not too loose. To gain some understanding of what I was trying to achieve I studied Walcherts valve gear on the internet and that made life more difficult not less. The critical difference between the real thing and a model is that on the model, radius rods do not move! You can solder them in place, all will be fine!
Well out of the 12 rivets supplied by DJH I have used 6 for the valve gear on one side, lost 4 and used two to make a start on the other side. I'm now waiting for 12 more 0.8mm rivets from a well know internet auction site so I can continue.
Happy modelling.