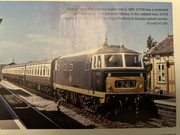
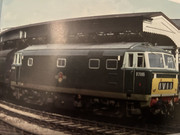
Not mine. A regular customer sent it for a repaint.
Painting and Weathering Service
Re: Painting and Weathering Service
"Not very stable, but incredibly versatile." 
Re: Painting and Weathering Service
Sorry, I'm a little behind on your thread... I was talking about the paint booth! 
Father, IT Guy, HO/OO Modeler.
Re: Painting and Weathering Service
I will be starting the project to repaint the class 35 shortly now that the transfers and paint has been obtained.
Once again, RailTec Transfers have come up trumps. They have produced a custom set of transfers with white numbers rather than silver and also made the data panels with clear backgrounds as this suits the maroon livery.
 11BCC594-7285-4BC8-9EBB-C3C24D2D4111 by Steve Mumford, on Flickr
The big question is the roof colour. In this photo it’s a dark grey rather than the usual ‘diesel roof grey’ so the pot on the right is probably closest.
 20BFDC1E-993B-4AE4-94DF-F2FCE5AB7116 by Steve Mumford, on Flickr
 AE183870-5A1F-4BE6-B2F8-6998208D9C34 by Steve Mumford, on Flickr
 6538E3FA-FA74-47E6-A2C7-B6CF43FB9D55 by Steve Mumford, on Flickr
And I’ve just noticed from the only two reference photos I have of D7076 - they show the loco with the old BR carriage crest on one and the more usual BR late crest on t’other photo.
Once again, RailTec Transfers have come up trumps. They have produced a custom set of transfers with white numbers rather than silver and also made the data panels with clear backgrounds as this suits the maroon livery.
 11BCC594-7285-4BC8-9EBB-C3C24D2D4111 by Steve Mumford, on Flickr
The big question is the roof colour. In this photo it’s a dark grey rather than the usual ‘diesel roof grey’ so the pot on the right is probably closest.
 20BFDC1E-993B-4AE4-94DF-F2FCE5AB7116 by Steve Mumford, on Flickr
 AE183870-5A1F-4BE6-B2F8-6998208D9C34 by Steve Mumford, on Flickr
 6538E3FA-FA74-47E6-A2C7-B6CF43FB9D55 by Steve Mumford, on Flickr
And I’ve just noticed from the only two reference photos I have of D7076 - they show the loco with the old BR carriage crest on one and the more usual BR late crest on t’other photo.
"Not very stable, but incredibly versatile." 
- Walkingthedog
- Posts: 4972
- Joined: Thu Oct 04, 2018 5:51 pm
- Location: HAZLEMERE, BUCKS.
- Contact:
Re: Painting and Weathering Service
Also the number is painted on in the second picture but on the first it looks like the numbers are 3D and fixed on. Could just be the shading.
Edit: just looked at some other pictures and the numbers look like they are stainless steel or similar.
Edit: just looked at some other pictures and the numbers look like they are stainless steel or similar.
Nurse, the screens!
Re: Painting and Weathering Service
Hi Steve,
Easy answer first - the crest is absolutely the old BR version and not the carriage roundel
The roof colour is more difficult, but after looking thru every Diesel Hydraulic book I have ( and I have quite a few), I am now of the opinion that the lighter colour is more prototypical……. However with all diesels of that time, the clag was so bad that very quickly the roof darkened and eventually went completely soot black from front to back
Also, the cab roof is the same colour as the body and not grey - so the top photo in your mail is incorrect in this regard.
Hope the two photos attached shed more light on all of the above
Cheers - Richard


Re: Painting and Weathering Service
So we will match the colours in the second photo (maroon cab roof with grey Centre panels) but with the late crest rather than the coach crest.
The RailTec late crests are very good so at least I get the chance to use them.
The RailTec late crests are very good so at least I get the chance to use them.
"Not very stable, but incredibly versatile." 
Re: Painting and Weathering Service
A slow start on the Hymek. Reduced the body to its component parts and started some masking ahead of a coat of primer. Not actually doing any painting until the humidity drops.
But I did manage to mangle one of the roof horns - the one out of the four that was actually glued in! Made some replacements in the 3D printer although it took a couple of attempts to get right. My first efforts were based on a trumpet horn but this was too thin to print successfully. These final versions are solid, just like the originals.
(Richard, I will send you some spares. )
)
 20231026_131012 by Steve Mumford, on Flickr
But I did manage to mangle one of the roof horns - the one out of the four that was actually glued in! Made some replacements in the 3D printer although it took a couple of attempts to get right. My first efforts were based on a trumpet horn but this was too thin to print successfully. These final versions are solid, just like the originals.
(Richard, I will send you some spares.
 20231026_131012 by Steve Mumford, on Flickr
 "Not very stable, but incredibly versatile." 
Re: Painting and Weathering Service
Hi Steve - sorry for the additional hassle……… would greatly appreciate a few spare horns as I noticed the other day that one of my other Hymeks was missing one - thanks
Re: Painting and Weathering Service
I have plenty"............£1000 each
"Not very stable, but incredibly versatile." 
Re: Painting and Weathering Service
I’ve been arguing with myself over the order in which to paint this one - normally it would be lighter colours first, darker last. That gives some challenges around the yellow panel and paint bleed - I know from past experiences that if the dark shades bleed into the yellow which are almost impossible to touch in with a brush as yellow is notoriously ‘thin’. So a slightly odd order of painting on this one.
The windows got their white topcoat yesterday. Masked them up along with the areas that will be painted yellow so that I can spray the maroon, touch up any bleed into the primer and then remark for the yellow panels.
In addition to tape, I seal the inevitable gaps with masking fluid then give it a coat of gloss varnish to further seal the edges.
 8EEAC0F5-AC30-4551-9BFA-6B1650A858FC by Steve Mumford, on Flickr
The windows got their white topcoat yesterday. Masked them up along with the areas that will be painted yellow so that I can spray the maroon, touch up any bleed into the primer and then remark for the yellow panels.
In addition to tape, I seal the inevitable gaps with masking fluid then give it a coat of gloss varnish to further seal the edges.
 8EEAC0F5-AC30-4551-9BFA-6B1650A858FC by Steve Mumford, on Flickr
 "Not very stable, but incredibly versatile." 
Who is online
Users browsing this forum: No registered users and 1 guest