PCB Sleepers
Re: PCB Sleepers
That is great feedback guys thank you very much. Brian that diagram really helps too, I had not thought about a ‘lateral’ fixing / locator where the boards come down so thank you. Away at the moment but will be modifying this as soon as I get home.
Cheers
Derek
PS not related, what does BBCode is On mean? Is there an explanation here that I can read?
Cheers
Derek
PS not related, what does BBCode is On mean? Is there an explanation here that I can read?
Re: PCB Sleepers
BBcode. See https://en.wikipedia.org/wiki/BBCode
If it's on it means it is available for you to use.
If it's on it means it is available for you to use.
Re: PCB Sleepers
Hi Rog,
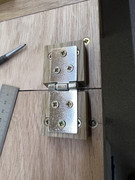
After much time spent on house chores finally managed to get on with the hinges. This is the result and as you said will give me loads of clearance when the track goes down.

After much time spent on house chores finally managed to get on with the hinges. This is the result and as you said will give me loads of clearance when the track goes down.

Re: PCB Sleepers
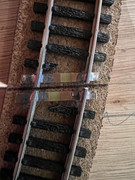
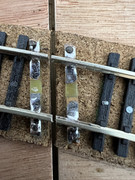
I have made my first attempt at using PCB strips as in this photo. I know it’s not pretty but have a couple of questions please before tackling the real curve tomorrow. BTW it has to be on a curve as I am very tight for space.
As you can see I have attempted to take partial ‘slices’ off the adjoining Sleepers, I don't think it looks nice at all so what do others do? Alternative I guess is to take 4 Sleepers out but that will be a huge space.
Secondly I tried using a Track Cutter before doing this but seemed to distort the rail too much so resorted to my trusty Dremel. First cut on the RH side I just could not get the disc down at right angles and have ended up with a cut about 1.5mm wide. Next I put my flexi drive on and that meant I could cut at 90 degrees and as you can see from the LH side I managed about a 1mm gap. I am wondering if this will be good enough when on the main layout, a trial with a Wagon on this piece works ok probably because the curve staggers the wheels over the join? What does the team think?
BTW what do you use to cut the bevel on the Cork? I have tried with guides and knives without success!
Thanks
Derek

Re: PCB Sleepers
I wouldn’t claim that my lift up track joints are any closer (also on a curve), but after a few adjustments all my locos cross them without any challenge.
I’m more curious about how the PCB sleepers are actually secured to the cork - I have used track pins or small pan head screws which allow a small amount of adjustment if needed down the line. They also look a little narrow to my eye - obviously the wider they are the greater the contact patch for the solder.
I’m more curious about how the PCB sleepers are actually secured to the cork - I have used track pins or small pan head screws which allow a small amount of adjustment if needed down the line. They also look a little narrow to my eye - obviously the wider they are the greater the contact patch for the solder.
"Not very stable, but incredibly versatile." 
- Walkingthedog
- Posts: 4972
- Joined: Thu Oct 04, 2018 5:51 pm
- Location: HAZLEMERE, BUCKS.
- Contact:
Re: PCB Sleepers
Can’t help with the cork I lay my track directly onto the board.
How have you fixed the pcb sleepers to the board?
Cut does look a bit wide. You need to use a very thin disc but must wear safety glasses.
I only had to trim a small amount of plastic sleeper, leave as much as you can, if you ballast the track it won’t be noticeable.
As you can see I have used lots of track pins to hold everything firmly in place.
My join is also on a curve.

Nurse, the screens!
Re: PCB Sleepers
Thank you Steve, Walking the Dog, I do appreciate your help. So I simply bought the strips from a store in the classified and just used Timebond to fix them to the Cork. Feels quite solid but the suggestion to pin is also appreciated. Where would you suggest I go for larger ones?
I have just been out and measured the Dremel disk, its 1mm and I can see you can buy thinner ones so will do that. Can either of you say what disk you use please?
It would be easy to say its the disk but thats only part of the story. The power in my hands to keep absolutely steady is not that great and this was my first time on the bench, learnt a lot about the process so will have another go later and try harder whilst waiting for thinner disks to arrive.
Finally must say WtD that is a brilliant piece of work in your photo, the metalwork and the scenic side, really gives me something to aim at!
Thanks again both,
Derek
Re: PCB Sleepers
There are a few suppliers out there - I think I used Marcway and a couple of suppliers at show for mine. I tend to buy it in 12” strips about 4mm wide that can be cut to length to give a bit of extra pinning space. You will have to cut your own insulating gap between the rails though.
I’ve also used 3cm copper clad sheet on one joint as it gives a larger area to solder the rails to.
My discs are about 0.5mm thick and best used with a slim rotary tool (I’m still using one bought from Woolworths about 25 years ago!) to get closer to a vertical cut.
I’ve also used 3cm copper clad sheet on one joint as it gives a larger area to solder the rails to.
My discs are about 0.5mm thick and best used with a slim rotary tool (I’m still using one bought from Woolworths about 25 years ago!) to get closer to a vertical cut.
"Not very stable, but incredibly versatile." 
- Walkingthedog
- Posts: 4972
- Joined: Thu Oct 04, 2018 5:51 pm
- Location: HAZLEMERE, BUCKS.
- Contact:
Re: PCB Sleepers
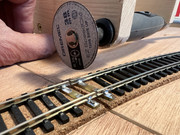
Thank you chaps for the encouragement. I know a good part of my problem is my hands shaking so I have made up a jig to bring my Dremel down at a nice clean angle to avoid un-necessary ‘wobbling’! I found a 0.75 Dremel disk and whilst not as good as your super example I have at least achieved a functional joint and run trains over it AOK. Feeling pretty content right now!
Off to Warley on Saturday with a mate and hoping to find a layout of the S&DJR (which is my personal focus) there.
Once again thanks for the advice.
Derek


Off to Warley on Saturday with a mate and hoping to find a layout of the S&DJR (which is my personal focus) there.
Once again thanks for the advice.
Derek


Who is online
Users browsing this forum: No registered users and 0 guests