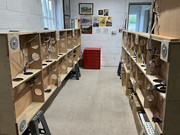
Baseboard access and removal
I'm just about to start construction of my baseboards and have a few questions.
Whilst I very much doubt I'll ever take my layout anywhere, it is being built in a part of the house we're planning on knocking down and rebuilding in the next few years (but I want to get cracking on my layout now ). So i'd quite like to build something I can take apart and move.
I'm also thinking about access, do people generally just do most of the underside wiring, point motors etc BEFORE any scenic work is done and then largely work on top after? Other than repairs or fault finding?
Is it feasible to have an arrangement where the base boards sit on top another frame with some kind of locating pins so they can be removed and flipped on their sides to work on the underside? Or is that not feasible once they have scenic components on top?
Basically is there any practical value in having the whole thing as "table" and then "baseboard" rather than "baseboard with legs" type arrangement?
Right now, I'm leaning towards making the legs easily removable so when we have the building work done I can rig up a frame where each section can just slid in for storage. on top of each other (with a gap allowing for scenery), as I wont have space to lay it all out elsewhere until the building work is complete, but I will have space to stack several boards.
Hope that rambling makes sense!
Re: Baseboard access and removal
That is exactly how I built mine. A frame, firmly fixed to the shed walls, with the layout built as modules that sit on the frame. I planned and laid the track first then flipped each board up to complete the wiring (bus, droppers, point motors and a separate DC bus for the eventual lighting).shed16 wrote: ↑Mon Dec 30, 2024 9:41 pm
I'm also thinking about access, do people generally just do most of the underside wiring, point motors etc BEFORE any scenic work is done and then largely work on top after? Other than repairs or fault finding?
Is it feasible to have an arrangement where the base boards sit on top another frame with some kind of locating pins so they can be removed and flipped on their sides to work on the underside? Or is that not feasible once they have scenic components on top?
Only once that lot was tested and running correctly did any scenic work start, especially ballasting the track. I planned mine in such a way that the majority of the points were on only two boards which makes wiring much easier.
Just bear in mind that each board joint will require rails to be cut and secured so that realignment is perfect when the boards are back on the horizontal. You will also need a way to separate the wiring between boards.
The boards will need to be of a size that can easily be lifted and bear in mind they will get heavy once all the various bits are attached. I found with mine that there came a point where it ceased to be a modular layout with the odd bit of work being done under the boards.
"Not very stable, but incredibly versatile."
- Walkingthedog
- Posts: 5023
- Joined: Thu Oct 04, 2018 5:51 pm
- Location: HAZLEMERE, BUCKS.
- Contact:
Re: Baseboard access and removal
And remember you need to be able to access all of the surface of the board.
Nurse, the screens!
Re: Baseboard access and removal
Thanks, sounds like my thinking is sound then. Do you have some photos to share or some details on the sizes for the frames for both?
3x1 for the baseboard frame so it clears any point motors and then what for the shed frame, isn't the risk that you then have a huge lip with the two combined? I plan to have a fiddle yard underneath so I want as much gap as possible.
BTW, is there a general rule of thumb with section sizes? I'm probably going 700mm deep and was thinking 1200mm long to reduce cuts, unfortunately that wastes a lot of board but I feel 600mm is too shallow.
Re: Baseboard access and removal
Plenty of photos early in my West Orton thread in Members Layouts.
As to board size the recommendation is that 2' wide is about right as any more than that makes reaching across the board difficult - you will damage anything placed at the front of the board. Regarding the frame, just make it to match the size and shape of the boards - my boards just rest on the frame, no need for vertical locating pins. They are heavy enough to stay put.
I can see your point regarding board length but 6' is a bit unwieldy so I prefer 4' for mine.
This website has been a great help to many of us over the years.
https://www.brian-lambert.co.uk/
"Not very stable, but incredibly versatile."
Re: Baseboard access and removal
Thanks, I had a look at your layout photos, so you just built a table and then put framed boards on top of that? So you have no access to the underside of your layout without lifting a board, or have I missed something?
1200mm is 4ft
I see how 1200x600 makes sense as you can get 4 equal size boards from a sheet with zero wastage.
1200mm is 4ft
I see how 1200x600 makes sense as you can get 4 equal size boards from a sheet with zero wastage.
-
- Posts: 397
- Joined: Fri Oct 05, 2018 6:49 pm
- Contact:
Re: Baseboard access and removal
If you know that you will have to dismantle the layout at some point point then you need to design that in from the start so a sectional baseboard is essential and that gives you the opportunity to do the wiring with the boards at comfortable height and accessible. As for supporting the base boards again how long will the layout be in place before it needs dismantling? A framework secured to walls obviously provides good stability but a more easily dismantled structure may be necessary and simple trestles and timber beams across will suffice.
Most people standardise on 1200 x 600 baseboard sections for a number of reasons. Firstly, a standard sheet of plywood cuts down to those sizes with minimum wastage. Secondly, as has already been mentioned if you need to lift or carry it it soon gets quite heavy. Thirdly, it comes down to reach and being able to reach things at the back is essential, bear in mind the average adult has a reach of 600mm from armpit to finger tips. Getting up on things and stretching to reach is fraught with dangers. Layouts can of course be wider but usually because the user has access to both sides but not when built against a wall.
Consider how you are going to wire it at the baseboard design stage and build it in from the start, soldering below a base board is not to be recommended. You may find that initial bus wiring and accessory wiring is straight forward while you have no scenery but layouts evolve and you need to consider how you wire in things once the baseboard is well advanced and lifting it becomes more complicated. I know of one layout where the modeller ran all his wiring in dado trunking attached to the front apron of the baseboards and all the jointing was done in the trunking. If you have plans for a lot of electronics for the layout instead of attaching them to the underside consider mounting them on wood panels hinged to the front of the baseboards these panels can be swung out of the way under the baseboards and held in place by a toggle but swung down for convenient wiring when needed.
You might want to look at Chadwick Model Rail
https://youtube.com/@chadwickmodelrailw ... YKpzAavRez
Although the layout is fixed he constructed it in sections doing all the wiring before installation and you can see the terminal strips used to take the wiring from board to board and much of the electronical components are mounted conveniently at the front
Richard
Re: Baseboard access and removal
I don't do metric - too old.shed16 wrote: ↑Tue Dec 31, 2024 11:28 am Thanks, I had a look at your layout photos, so you just built a table and then put framed boards on top of that? So you have no access to the underside of your layout without lifting a board, or have I missed something?
1200mm is 4ft
I see how 1200x600 makes sense as you can get 4 equal size boards from a sheet with zero wastage.
The frame is open, plenty of access.
"Not very stable, but incredibly versatile."
-
- Posts: 1556
- Joined: Fri Oct 05, 2018 12:57 pm
- Contact:
Re: Baseboard access and removal
There are more ways than one to do the same thing, and it depends on ones circumstances.
Thoughts through my limited experience.
Getting layouts to run before completing the scenery is the best idea for obvious reasons. Though if one is building a valley or a raised tracked or other similar features, one natrually needs to first make the skeletal foundations of the layout before one adds the track...
Baseboard joints. More than one way. A simple nut, bolt and washers will do the job, but take time to do up and undo. Other methods can be far more precise with track alignment, BUT sometimes this may not be a good thing, as when I was building my current layout which is half done, and has been stored in a box for ages due to personal circumstances, I built the layout using reclaimed wood. (One can get similar issues if one buys wood so one is not immune from this if one does), and I found that I could get track alignment perfect, but six months later when the seasons changed, the track alignment would be out. Get track alignment fixed, and then six months later again it goes out! So what did I do to solve this? I cut the track a few inches back from the edge of the board, and made short bridging pieces of track to cross between the two boards being joined. The bridging tracks are held in place using stronger Lima rail joiners from the past, so when I need to separate the two boards, I slide back the sleepers and remove these bridging pieces of track first. Problem solved! (Natrually one may need to go easy on the scenic touch with these removable pieces of track).
Budget modelling in 0-16.5...
Re: Baseboard access and removal
I took advantage of moving house to tidy up my layout wiring and add sensors for loco detection. Most of my wiring was originally done from on top with wires fed under the boards to top-side distribution boards and modules, etc.
Standing the main boards on edge at a seated working height was a bonus as I could access both sides.
I have a slide in removable section for access.
Standing the main boards on edge at a seated working height was a bonus as I could access both sides.
I have a slide in removable section for access.
Who is online
Users browsing this forum: No registered users and 0 guests