Sandy Hills The new layout
Re: Sandy Hills The new layout
Yes BB but I have not got the guts to try it am going to leave well alone. 
Sandy

Re: Sandy Hills The new layout
I wouldn’t put a wash directly onto paper, unless it’s sealed it would soak in. Also the inks used may not be run proof.
Maybe powders (as much as I don’t like them) would be an option?
Maybe powders (as much as I don’t like them) would be an option?
"Not very stable, but incredibly versatile." 
Re: Sandy Hills The new layout
When I read your suggestion BB I thought you were thinking it was plastic sheets but it is thin card very much like thick lining paper.
Sandy
Re: Sandy Hills The new layout
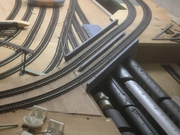
Next job has to be the Stations followed by a lot of ballasting.
Sandy
-
bulleidboy

- Posts: 2394
- Joined: Thu Oct 04, 2018 6:30 pm
- Location: Basingstoke, Hants
- Contact:
Re: Sandy Hills The new layout
Sandy - I think I now recall you saying the "walling" was embossed paper, so Steve was absolutely right when he said not to use paint (liquid) on it. As with all these things, we are all trying to take the "newness" out of whatever we are building.
Re: Sandy Hills The new layout
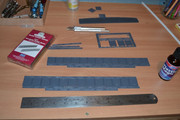
Started the bridge kit this afternoon. Got all the parts cut off and cleaned up ready to assemble. I think this kit is a bit fiddly.
Sandy
-
bulleidboy
- Posts: 2394
- Joined: Thu Oct 04, 2018 6:30 pm
- Location: Basingstoke, Hants
- Contact:
Re: Sandy Hills The new layout
I used one of those kits Sandy - all very straightforward - no problems at all.
Re: Sandy Hills The new layout
BB Did you stick the square plates together first then add to the bottom and top plates.
Sandy
Re: Sandy Hills The new layout
Hello Sandy
I used a kit to make this bridge, as I made it for two tracks I used the odd bits of left over plastic to make the middle girder between the tracks.
Puddles
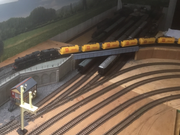
I used a kit to make this bridge, as I made it for two tracks I used the odd bits of left over plastic to make the middle girder between the tracks.
Puddles
It does not take me long to do five minutes work.
Nostalgia is not what it used to be.
Nostalgia is not what it used to be.
-
bulleidboy
- Posts: 2394
- Joined: Thu Oct 04, 2018 6:30 pm
- Location: Basingstoke, Hants
- Contact:
Re: Sandy Hills The new layout
Yes I did. I used a steel ruler as a guide to keep everything straight and level before adding top and bottom plates. My bridge side was not very long, but it worked for what I wanted.
 IMG_1125 by Barry Clayton, on Flickr
Who is online
Users browsing this forum: Bing [Bot] and 4 guests