Bridging the gap

All posts regarding baseboard construction
Tricky Dicky
Posts: 387
Joined: Fri Oct 05, 2018 6:49 pm
Contact:

Re: Bridging the gap

#21

Post by Tricky Dicky »

footplate1947 wrote: Tue Apr 16, 2019 3:59 am Whats the dereference between the two types. One is adjustable which is why most builders fit non rebated. The rebated ones are not adjustable. So what is the difference Brian 1951. ......................................John
In comparison to my daughters I would say overall thickness excluding the rebate which I would see as an advantage when lining an opening in a brick wall where traditionally linings were fixed to timber wedges inserted between brick courses thus making it easier to keep plumb.

I note in my daughters house every door is in a studded wall therefore the plumbness of the lining is more dependant on how plumb the underlying stud is.

Richard
Last edited by Tricky Dicky on Wed Apr 17, 2019 9:50 am, edited 1 time in total.
footplate1947
Posts: 758
Joined: Fri Oct 19, 2018 8:32 am
Location: Norham, Northumberland
Contact:

Re: Bridging the gap

#22

Post by footplate1947 »

It all comes down to using what is best. Al I said in the first place was most houses use a flat standard type of frame a cheaper and be adjustable to walls and doors being out of plumb in old houses. You should see some of our doors and frames. Our cottage is about 150 years old and they are all over the place and they look lovely. Most of our doors are also original with including the locks and hinges. Like WTD said the chippy would use what is best for the job.
If only there was enough hours in the day..................John
Richard
Posts: 65
Joined: Mon Nov 05, 2018 3:14 pm
Location: Chichester
Contact:

Re: Bridging the gap

#23

Post by Richard »

Hello everyone.
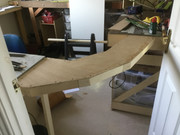
I thought that you would like to see the progress that I have made on my lift out section. It’s very simply made. Starting with a piece of ply held in position while I try out various curve radii to see what is needed. Then roughly marking out in free hand followed by finalising the angles with a steel ruler. After cutting the ply to size and shape the rest is straightforward, using the ply to determine the length and angles necessary to be cut from 2+1 timber. Then the usual screwing and gluing. Each end rests on a length of 2+1 screwed into the baseboard ends. The next step is to top with Sundeala followed by the installation of 1+1 protection walks each side and the devising of a method to ensure the bridge is held securely in place, probably simple bolts.
Image

Image
User avatar
Steve M
Posts: 3461
Joined: Thu Oct 04, 2018 5:29 pm
Location: Rochester, Kent
Contact:

Re: Bridging the gap

#24

Post by Steve M »

Exactly what I had in mind in post #8.

You will need to take into account both vertical and lateral movement for your support - I will post a pic or two tomorrow of my solution that may help.
"Not very stable, but incredibly versatile." ;)
Richard
Posts: 65
Joined: Mon Nov 05, 2018 3:14 pm
Location: Chichester
Contact:

Re: Bridging the gap

#25

Post by Richard »

Thanks Steve. Your were the inspiration! Thanks. Ideas for making it secure will be very welcome.
User avatar
Steve M
Posts: 3461
Joined: Thu Oct 04, 2018 5:29 pm
Location: Rochester, Kent
Contact:

Re: Bridging the gap

#26

Post by Steve M »

Richard, as promised.

These are the locating dowels that I use, found them on eBay - lots available.

Image20190420_101945 by Steve Mumford, on Flickr

I think they need a 8mm hole drilling through the two pieces to be aligned (make sure the boards are straight and level before you do :D )
Tap them in place with a hammer having put a smear of PVA in the hole to secure them.

Image20190420_101546 by Steve Mumford, on Flickr

Image20190420_101653 by Steve Mumford, on Flickr

This arrangement stops the boards pulling apart and sliding from side to side but it is likely that you will need something to stop it from moving up - I use small door bolts but you could use any form of suitable catch for your location. I find that even though the section is well supported either the lift out can twist or there will be slight variations in level across the ends of the layout boards so I use two bolts at each joint either side of the track. That may be relevant as your section is quite large.

Finally, crossing the joint with track. A tried and trusted way is to fix copperclad strip to the board and lay the track across the joint having removed the sleepers where the copperclad sits. Then solder the rails to the copperclad and then cut the rails with a Dremel or fine saw. It should all line up!

Image20190420_101757 by Steve Mumford, on Flickr

Then the last steps are to cut through the copperclad between the rails (to avoid a short circuit) and add wiring under the board - I use either audio DIN plugs or computer D sub connectors depending on how many wires I need to take across.
"Not very stable, but incredibly versatile." ;)
footplate1947
Posts: 758
Joined: Fri Oct 19, 2018 8:32 am
Location: Norham, Northumberland
Contact:

Re: Bridging the gap

#27

Post by footplate1947 »

Nice work Richard.....It did not look in the first picture you had room to do that. But the end result is lovely.
Nothing like being there with tape measure and seeing the problem for real. Not so easy to see in a picture is it. John
If only there was enough hours in the day..................John
User avatar
Steve M
Posts: 3461
Joined: Thu Oct 04, 2018 5:29 pm
Location: Rochester, Kent
Contact:

Re: Bridging the gap

#28

Post by Steve M »

Richard, I have had another thought regarding the Sundeala you are using (not a material I would use though).
At the board edges it may prove to be prone to damage and movement as it is a bit soft. I would put a strip of ply, the same thickness as the Sundeala and about 4cms wide, to provide a strong edge to ensure the track is firmly located at the cuts and give a strong base for the doorbolts if you use them.
"Not very stable, but incredibly versatile." ;)
Richard
Posts: 65
Joined: Mon Nov 05, 2018 3:14 pm
Location: Chichester
Contact:

Re: Bridging the gap

#29

Post by Richard »

Thanks Steve. There is ply underneath the Sundeala and beneath that the 2+1 timber so I hope to be able to get a good fix for bolts and for fixing the track down. However I’ll have a think about providing a harder edge where the bridge meets the baseboards. And thanks for the tip for using the locating dowels. I had seen something similar on a YouTube video, but American in think.
And thanks everyone for your encouragement. It’s not perfect, and I wouldn’t want anyone to inspect my joinery too closely, but it’s good enough, and that’s what counts.
Richard
Posts: 65
Joined: Mon Nov 05, 2018 3:14 pm
Location: Chichester
Contact:

Re: Bridging the gap

#30

Post by Richard »

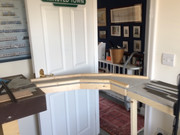
This is how it looks more or less completed. Adding the Sundeala and the sidewalls has revealed a problem with levels on the right side which will need attending to. It’s not intended to be a scenic section but I might just add some Metcalfe walling to smarten it up a bit.

Image
Post Reply

Who is online

Users browsing this forum: No registered users and 1 guest