Page 10 of 18
Re: Sandy Hills The new layout
Posted: Thu Feb 24, 2022 9:19 pm
by sandy
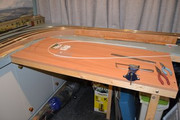
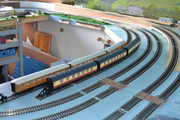
Now all the track is down I needed somewhere to work . As the Loco Yard is removable I came up with this idea. For a work bench which just drops into the same space used by the Loco Yard and is held in place by 2 bolts and wing nuts and takes about 2 minutes to set up and take down.


Sorry about 2 pictures but first one was bit small
Re: Sandy Hills The new layout
Posted: Thu Feb 24, 2022 9:36 pm
by Steve M
You can never have too many workbenches Sandy. I currently have seven and a half.

Re: Sandy Hills The new layout
Posted: Fri Feb 25, 2022 4:55 pm
by bulleidboy
Sandy - if you decide to go ahead with the Woodland Scenics Rock Moulds, when it comes to painting, this video may help? I found it very useful.
https://www.youtube.com/watch?v=3SfP4RpcDYw&t=2s
Using the Woodland Scenic Mould and W/S diluted pigments, this was my finished rock face. If you wanted a more "granite" looking rock, use more greys and black - heavily diluted. The picture shows one rock from the mould it's about six or seven inches long and three, maybe four inches high. Depending on what material you are attaching them to, in my case insulation foam, I found that by putting a couple of 1.5" galvanised nails, head first into the plaster, once set, it allowed me to push the rock face up against the foam, and the two nails held it in place, it is also easily removeable should you need to relocate it. Barry
 IMG_0755
 by
Barry Clayton, on Flickr
Re: Sandy Hills The new layout
Posted: Tue Mar 08, 2022 11:03 am
by sandy
Thanks BB. Yes intend to get some rock moulds as have tried other methods but never got results as good as that. The vidio did help. I live in Scotland and around here there is plenty of rocky scenery to look at the real thing not to far away. But watching the vid shows how to achieve the results you want. Thank you very much for that BB.
Re: Sandy Hills The new layout
Posted: Sun Mar 13, 2022 2:08 pm
by sandy
Have been spending time wiring for it seems ages. Still got lots of dropers to fit. Fish plates arrived yesterday so got on this morning with laying 2 new sidings for coaches. There will be no pictures of wiring just think of a birds nest.


Re: Sandy Hills The new layout
Posted: Sat May 14, 2022 9:46 am
by sandy
Have got some rock moulds so will be experimenting with painting those this weekend. Going up into the hills for a picnic today and will be taking some photos of rocks in the low lands to get an idea of the colourings of the rocks in the area.
Re: Sandy Hills The new layout
Posted: Sat May 14, 2022 9:56 am
by Walkingthedog
sandy wrote: ↑Sun Mar 13, 2022 2:08 pm
Have been spending time wiring for it seems ages. Still got lots of dropers to fit. Fish plates arrived yesterday so got on this morning with laying 2 new sidings for coaches. There will be no pictures of wiring just think of a birds nest.


Sandy I was taught to do very neat wiring when I did my GPO Telephones apprenticeship. I started wiring my layout with good intentions but the underside looks like an explosion in a knitting wool shop.
Re: Sandy Hills The new layout
Posted: Sat May 14, 2022 9:58 am
by sandy
Thanks for the support WTD

Nice to know I am not the only one.
Re: Sandy Hills The new layout
Posted: Sat May 14, 2022 11:19 am
by Steve M
My first layout’s wring was the work of a demented spider, spinning many multi coloured webs under the boards.
By the time I did my second layout, the spider had been partially tamed.
On the current layout, it appeared that the spider was responding to treatment, was fully under control and was even performing tricks under the boards.
Sad to report that now the station lights are being wired, the spider seems to have had a relapse.

Re: Sandy Hills The new layout
Posted: Sat May 14, 2022 3:11 pm
by Bandit Mick
My wiring was lovely and tidy with ties and labels. I then added lighting and its now all a bit crossed over and dangly!


