Porjus

Dedicated area to show the community your model railway projects.
User avatar
Stese
Posts: 352
Joined: Thu Oct 04, 2018 9:26 pm
Location: Wrexham, UK
Contact:

Porjus

#1

Post by Stese »

Again, I've had to abandon a plan, to allow for changing personal circumstances so I'm starting again (3rd iteration!)

I'm following a similar theme as before, basing the area on Central Sweden but in general running whatever I wish... :).

The biggest change to the plan is that rather than a layout outside, I'm now building a modular style layout that I can get out and put away when I need to. Over all, the external area will be 4.8m x 2.4m ( 16' x 4' approx.), made up of 4 x 1.2m*.6m boards, and 6 x 1.2m * .3m boards, arranged in a square. There is an operators space in the middle.

I have a track plan :

Image

The 'missing' section will be a simple loop which will branch into a few lines as a fiddle yard.

The baseboard tops are 9mm ply (I should have got better quality, but oh well), and the bracing is done with 18mm OSB cut into strips.

Image

Image

I've painted them with grey emulsion to tidy them up a bit and have started on track laying... here's the progress so far..

Image

Image
Father, IT Guy, HO/OO Modeler.
Mountain Goat
Posts: 1511
Joined: Fri Oct 05, 2018 12:57 pm
Contact:

Re: Porjus

#2

Post by Mountain Goat »

Looks good.
Budget modelling in 0-16.5...
User avatar
Stese
Posts: 352
Joined: Thu Oct 04, 2018 9:26 pm
Location: Wrexham, UK
Contact:

Re: Porjus

#3

Post by Stese »

It seems my model railway life is all about changes...

In my other thread in layout planning, you'll see that I've abandoned the self build baseboards, and also the circular nature of the layout... in favour of a smaller end-to-end design built on Ikea shelving... I've now got to the point where I can actually start getting track down onto the boards, to test the design of the layout etc...


Image

Image

I've stopped here for now, as I've run out of Insulating Fishplates... but i've got some on the way so there'll be more progress soon! :D
Father, IT Guy, HO/OO Modeler.
User avatar
Stese
Posts: 352
Joined: Thu Oct 04, 2018 9:26 pm
Location: Wrexham, UK
Contact:

Porjus

#4

Post by Stese »

*Warning picture heavy post!*

Its been a little while since I've posted, but there has been some progress.

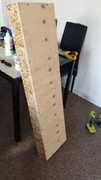
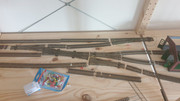
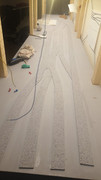
I eventually managed to loosely lay all the track, and was happy with the layout and how it looked...

Image Image Image Image
-----

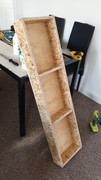
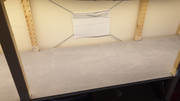
From here, I removed the track, and laid 5mm thick plywood sheets to cover the gaps between the shelves. There's now only 1 gap, and it's bearly 1mm. This has all been painted grey, as a primer and general base colour.

Image Image
-----

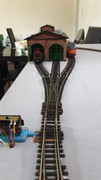
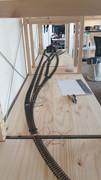
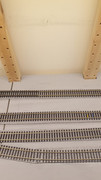
Track was then relaid and pinned into place with drawing pins, adding trackfeeds where needed. This allowed to test everything with a free rolling wagon. Holes marked for the location of trackfeeds and points.

There's a few curves in there that weren't quite right, but they were close enough to allow me to move on.

Image Image
-----

Now it was time to lay, glue and paint the cork. Its simply being used to raise the track so a good ballast shoulder can be created. I know painting and ballasting it will prevent it dampening any sound. Holes are drilled for the track & frog feeds, plus larger holes for the point motor pins to come up from the bottom.

Image Image
-----

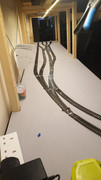
Now the track is glued into place using normal B&Q PVA. it's held in position using raised thumbtacks.The tacks allow me to place downward pressure on the rail, and also lateral pressure to ensure the desired curves are maintained. This seems to have held well. The track feed wires are passed through the pre-drilled holes, ready for connection underneath.

Image Image Image Image

-----
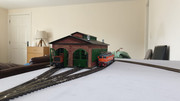
Turning attention to scenic matters, I've started to layout where physical features will be.

Image Image

Image

-----
Alongside the layout work, I've started the control panel.

Image Image

Image Image

-----

That about brings you up to date... over the christmas break, I'll be putting in all the wiring under the boards, and completing the control panel, so I can start to run trains! woo!
Father, IT Guy, HO/OO Modeler.
User avatar
Steve M
Posts: 3394
Joined: Thu Oct 04, 2018 5:29 pm
Location: Rochester, Kent
Contact:

Re: Porjus

#5

Post by Steve M »

Good progress.
But a warning, my wiring started that neatly. ;)
"Not very stable, but incredibly versatile." ;)
User avatar
Stese
Posts: 352
Joined: Thu Oct 04, 2018 9:26 pm
Location: Wrexham, UK
Contact:

Re: Porjus

#6

Post by Stese »

Oh, i'm not finished in there, I have no doubts it will get messy.
Father, IT Guy, HO/OO Modeler.
User avatar
Steve M
Posts: 3394
Joined: Thu Oct 04, 2018 5:29 pm
Location: Rochester, Kent
Contact:

Re: Porjus

#7

Post by Steve M »

The ‘bird’s nest under the boards’ should be seen as a badge of honour. :D
"Not very stable, but incredibly versatile." ;)
cheshire lines
Posts: 383
Joined: Tue Oct 09, 2018 4:40 pm
Contact:

Re: Porjus

#8

Post by cheshire lines »

Looking good so far.
User avatar
Brian
Posts: 2171
Joined: Thu Oct 04, 2018 3:49 pm
Location: SE Kent
Contact:

Re: Porjus

#9

Post by Brian »

Wow. A really good start. I like the choice of OSB for the framing. I used 11mm OSB for my "High Hopes" basebaods and aI am very pleased with its strength, flatness and stability. :D The track laying looks good.
Image << Click the Icon to go to my website
User avatar
bulleidboy
Posts: 2257
Joined: Thu Oct 04, 2018 6:30 pm
Location: Basingstoke, Hants
Contact:

Re: Porjus

#10

Post by bulleidboy »

Progressing well - can't wait for the next instalment.
Post Reply

Who is online

Users browsing this forum: No registered users and 4 guests