Kraggie Gorge cum Alesund

Dedicated area to show the community your model railway projects.
DavidR
Posts: 11
Joined: Sun May 07, 2023 4:12 am
Contact:

Kraggie Gorge cum Alesund

#1

Post by DavidR »

Hi Guys,

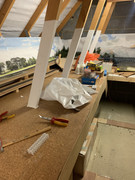
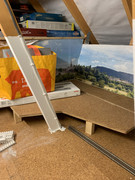
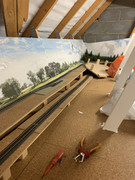
Oh my, been in the loft this afternoon after finishing my inventory of locos. After 7 years of doing very little, there is plenty of clearing up and adjustments on the ramp and high level. I know now that the spacers were too far apart :lol: My word what a mess. I will post some photos of before I clean up :roll:
I have decided to call the project Kraggie Gorge cum Alesund.


Image
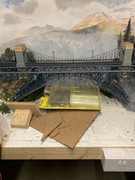
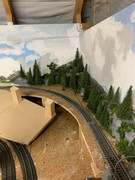
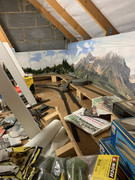
Kraggie Gorge end it will have a river with a theme going on with two roads either side Two high level bridges and three low level (one for the AC looping track with AC locos running around)

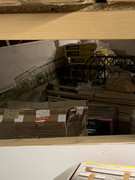
Left side of bridges

Image

Right side of bridges
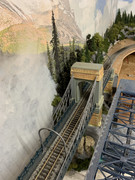
Image

Bridges

Image

Alasund station will be on the left hand side of the layout.

Image


I need to work out the rise for the high level as I am not sure if it is right.

Alesund town at the opposite end of Kraggie Gorge

Image

Behind Alesund Town on the high level left side there are two portals that will lead into an industrial area maybe use that as a loco shed area with three or four sheds coaling and diesel set up.

Image

On the right side of the layout, I think I will have a country area with a couple of sidings and maybe a good tunnel

Image


These are just thoughts at the moment, however, I am up for advice and any suggestions. Yes it's a dam mess at the moment :o and plenty to do. But I am sure it will look great when finished :lol:

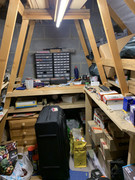
I also have a little work bench area, again a mess.

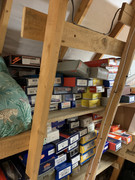
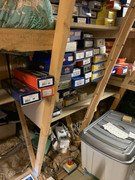
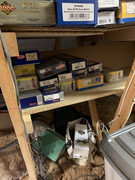
Now the loco shelfs Top Steam, Middle Diesel, Bottom Electric.

Image

Image


Image

Image

There is plenty to do with all the wiring and laying the track, scenery, buildings, lighting etc. But i know I will enjoy it.

Image

As you may know I will be have a mix of UK, European and US locos running around Those US ones will be good to gauge the distance for the tracks on corners as I will use the articulated carriages and the overhang! :o Will see what happens, no doubt a lot of trial and error to get it right.
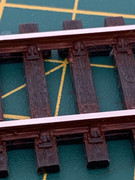
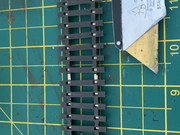
I will as the question, in my loft the temperatures get hot in summer and cold in winter. During the hot weather do I leave a 1-2mm gap between the rails on the joints for further expansion?
I will appreciate any comments and pointers.

BR

Dave
Bandit Mick
Posts: 908
Joined: Thu Oct 04, 2018 7:42 pm
Contact:

Re: Kraggie Gorge cum Alesund

#2

Post by Bandit Mick »

Ouch! I leave the thickness of a credit card or thereabouts as a gap between my rails for expansion.
User avatar
Walkingthedog
Posts: 4926
Joined: Thu Oct 04, 2018 5:51 pm
Location: HAZLEMERE, BUCKS.
Contact:

Re: Kraggie Gorge cum Alesund

#3

Post by Walkingthedog »

You need the gap in cold weather so it is there when it gets hot. If you have the gap in hot weather it may be too big in cold weather.
Nurse, the screens!
User avatar
Brian
Posts: 2171
Joined: Thu Oct 04, 2018 3:49 pm
Location: SE Kent
Contact:

Re: Kraggie Gorge cum Alesund

#4

Post by Brian »

Track laying with an ambiant air temprature in the layout room of around 20 to 24C I too would leave a credit card gap on every yard length of flexible track. If using Setrack then you can halve the gap at 24C Max. If its warmer you can decease the gap, but a credt card is ideal for all rail joints :D
Always store the track in the place where its to be laid for at least 24 hours before attempting any track laying,
Image << Click the Icon to go to my website
DavidR
Posts: 11
Joined: Sun May 07, 2023 4:12 am
Contact:

Re: Kraggie Gorge cum Alesund

#5

Post by DavidR »

Thanks Guys,

Noted about the gaps, a bit of a tidy up needed, it will look better when all the rubbish is out of the way.

Cheers

Dave
DavidR
Posts: 11
Joined: Sun May 07, 2023 4:12 am
Contact:

Re: Kraggie Gorge cum Alesund

#6

Post by DavidR »

Hi Guys,

I am not telling anyone to such eggs, it is mainly for someone who is contemplating building a layout and never done it before. like me :lol: Throughout this build there will be many mistakes, but I will learn from it and others too, also some good pointers as well and maybe come up with a solution that no one has ever thought about, you never know.

I have put the tidy up on hold at the moment. However, I have started preparing the tracks for the layout, for this I needed some acrylic paint rust colour, but I purchased the appropriate colours to make a rust colour. Much cheaper that buying ready mixed! By the way I purchased a load of second hand used track to save the pennies and to re use. Most of it is code 100 a mix of Hornby & Peco. Some are Peco streamline finescale code 75 (will separate when painted). I hear that sometimes locos and freight etc. can derail with no transition section from code 100 to 75.

Image

Here is the mixing pot with colour already mixed.

Image

The brush I used was an artists one, a code H. When painting I did the inside first then wiped down with a kitchen towel. I am not too fussed about getting paint on the sleepers and most if not all will be hid up by the ballasting. As for the top of the rails, again not bothered about getting paint there either.

Image

The above is before painting (don't take much to work out :) ) Below is during painting, I did it with the track at a slight angle to ensure the track sides were covered with a side to side sweep not loading the brush too much.

Image

When the tracks were painted and cleaned with the kitchen towel I let them dry and the used a track rubber to clean the tops of the rails. I was pleasantly pleased on how they turned out.

Image

I have a load more to do without the points and radius track. (will tackle that later).

Image

As I am into DCC and it is good practice to add dropper wires for every piece of track, so that was the next task preparing them for DCC.
What I did was to tin the ends of 0.75mm multi strand wire 600mm in length. Cut the plastic in the middle of a length of track between 2 sleepers. tinned that area with a small amount of solder. Then soldered the wires to the track. I am sure you can follow the steps in the photos below.


Image


Image


Image


Image


Image


Image


Image


Image

That will be it for a while, need to finish doing the straight track. Next, I will tackle the points, weather them and install the point motors on the underside of the points. This will be a task, as all the base boards are installed in the loft. Anything to save crawling about underneath.
User avatar
Walkingthedog
Posts: 4926
Joined: Thu Oct 04, 2018 5:51 pm
Location: HAZLEMERE, BUCKS.
Contact:

Re: Kraggie Gorge cum Alesund

#7

Post by Walkingthedog »

You can’t directly join code 100 to 75. Plenty to keep you occupied, keep the pictures coming, we like pictures.
Nurse, the screens!
User avatar
bulleidboy
Posts: 2257
Joined: Thu Oct 04, 2018 6:30 pm
Location: Basingstoke, Hants
Contact:

Re: Kraggie Gorge cum Alesund

#9

Post by bulleidboy »

I would add droppers to each individual piece of track. Peco do a "transition" track (Code 100 to Code 75) - it might be best to sort out the track so that all of one type is in a certain area - Code 75 is in a fiddle yard for example.
DavidR
Posts: 11
Joined: Sun May 07, 2023 4:12 am
Contact:

Re: Kraggie Gorge cum Alesund

#10

Post by DavidR »

Thanks guys, noted about the transition piece of track from code 100 to 75. At the moment I have found 4 lengths of code 75 as I am weathering the rails. Thanks for the tip on where to use these tracks Bulleidboy, I have a area earmarked for them if I get short of code 100.
Post Reply

Who is online

Users browsing this forum: Google [Bot] and 4 guests