Hi all following on from my various posts, I'm going to document my progress here.
I have a reclaimed old set from an reletive rented property clearance, when the tenant left. Most of the engines are mine from childhood. As a kid the loft wasn't very suitable I remember crawling around on hands and knees in the dust with track laid on foam directly on the floorboards, never really worked. I've always wanted to have a go at my own and hav own family , I'm trying to get the 6 and 12 year olds involved. I am on a shoe string/£0 budget.
I started off with an around the room layout on boards on the floor, just to test things . decided to consolidate and went with an 8*7 area with a central well.
The frame is an old kitchen table with batons layed and screwed down with one baton affixed to the back wall, under the window. I made a couple legs for the back furthest away from the wall. The boards are from an old kitchen cabinet, pine wood at the front and MDF down side and back, all sanded down, sealed with watered down pva glue and emulsion paint. At least one of the boards is slightly warped.
Whilst I was making the baseboard, I also soaked all the old track (mix of steel and nickel) in vinegar for 48 hours, scrubbed it with toothbrush and dried on lint towel. I also brought 15 double straights for £15 and some fishplates and screws.
My first layout attempt was from free track plans, "Neville's green" 8*6 with 4 tracks at the front plus sidings. I found some old drain pipe as a tunnel around the back straight. I got to the point of trying to install point motors directly in to the board but was struggling to get the motors to stay in place and I managed to break a couple of the points.
Some of the points are also "dead"/isolated and when testing problems started arising, such as stalling or derailing.
I've taken the decision to start again, with a simple oval at the front, I have since added twin main lines from the loop down the sides and along the back. I think this will be a better layout allowing more modelling space in the centre of the front boards.
I have recently found some insulation boards at 100mm & 50mm thickness which I plan to cut and place track on this, which should make it easier to install motors and things as well as scenery like rivers and embankments etc
I'm currently in the process of testing what I have so far put down.
Image below is my copy of Neville's green.
Mod Note ... Two images resized and rotated.
Newbie attempt at 1st layout
Newbie attempt at 1st layout
Last edited by AndyH on Fri Aug 07, 2020 3:29 pm, edited 2 times in total.
Re: Newbie attempt at 1st layout
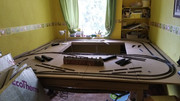
Current layout in progress
Insulation boards, just need to work out best way to use them, some are 100mm thick others 50mm
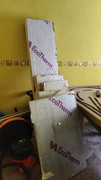
Insulation boards, just need to work out best way to use them, some are 100mm thick others 50mm
Re: Newbie attempt at 1st layout
I have lost count of the new topics you have started to discuss the SAME issues you are having. It is starting to annoy people trying to help you, so keep to the same thread please.
Re: Newbie attempt at 1st layout
Apologies, wasn't sure where to put everything, greatful for the help and advice. Will now keep updating this one.
Thought members layout be for completed working layouts. Baseboard issues under baseboard and electrical under dc. As I say apologies dont mean to annoy anyone.
Thanks Andy
Who is online
Users browsing this forum: No registered users and 6 guests