Big Geom - An adventure in N Gauge

Dedicated area to show the community your model railway projects.
Post Reply
User avatar
andruec
Posts: 146
Joined: Sun Nov 15, 2020 11:01 am
Location: South Northants
Contact:

Big Geom - An adventure in N Gauge

#1

Post by andruec »

The first layout I've built myself and the first layout I've owned for over 40 years. It's not based anywhere in particular and is really just a test bed for ideas. Hopefully it'll be taken through to completion but if/when I find the ideal retirement house it will have a bigger room for trains so at that point who knows what will happen. Work started in late November 2020 when the board arrived. Since then I've been doing an hour most days in the evening and a couple of hours at the weekend. I've been held up by stock shortages but as of 29th December the only thing I'm missing is a right turnout for a siding which I can live without initially.

But here's what I've got so far, I'll keep this updated over time.

The baseboard is actually made up of three baseboards from Model Railway Solutions:
Image

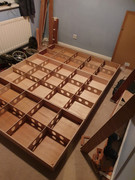
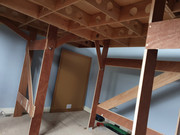
It was after assembling the legs that I realised there was a problem. The legs are assumed to all go at the end of each board but my end boards are attached to the main board by their sides. Some quick thinking and I made it work by putting the legs in the middle instead of at the end. It means that the corners aren't supported but the bolts joining the boards together mean they are pretty solid.
Image

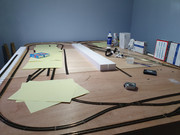
All of the zero elevation track glued into place. Note 'Wilf's Junction' near the camera. Named after my late Dad. This allows trains to move to/from the outer loop and the inner figure of 8. The furthest diamond crossing forms the cross over for the figure of 8 and will eventually be hidden under an elevated section.
Image Image Image

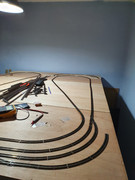
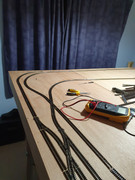
The missing bits are the side elevations which will rise away from the camera to a mezzanine by the wall (the board is visible in the distance but not supported yet), two more elevations coming back down the middle toward the camera which allow for the furthest diamond crossing to be hidden. This elevated section also carries two sets of sidings, four on each side which sit above/inside the each loop of the figure of 8.

The rolling stock is mostly contemporary, several goods trains, an HST and a 'Sunday Special' comprising a Queen Elizabeth 4-6-2 and blood and custard coaches. There will eventually be two Class-08 Gronks consigned to moving stock in and out of the sidings.
User avatar
bulleidboy
Posts: 2265
Joined: Thu Oct 04, 2018 6:30 pm
Location: Basingstoke, Hants
Contact:

Re: Big Geom - An adventure in N Gauge

#2

Post by bulleidboy »

You seem to be getting on well. I also have MRS boards - very easy to assemble - I don't think you will have any problems with the legs. I actually went down and collected my boards - living in Hampshire, a trip to Poole was a nice day out. If you were to have a straight run of boards, MRS say to fit one set of legs per board - the other end is supported by being bolted to the next board - which has its legs where the two boards are bolted and so on - you would only need a pair of legs on the last board. It's all very strong stuff - during construction I walked on my boards - no problem. Looking forward to seeing how you proceed - don't forget - no need to rush it :D BB
User avatar
andruec
Posts: 146
Joined: Sun Nov 15, 2020 11:01 am
Location: South Northants
Contact:

Re: Big Geom - An adventure in N Gauge

#3

Post by andruec »

Yeah the problem with the legs was just that the cups they give only work if the legs are at the narrow end. In other words I think their primary intention is to have the boards strung out into a narrow rectangle. That's reasonable given the usual 'one metre' reaching limit. But my layout replaces a double bed so the boards are fixed long side together. I dare say if I'd mentioned that at the time they'd have made wider legs for me but it seems stable enough. I could always add more legs if I felt it was needed, or just supplement the bolts with braces.

As for time scales, my intention has always been to get all the track fixed in place before spring. Not necessarily fully wired up and probably not ballasted at all. At that point (especially when the clocks go forward) golf will be my consuming passion. Which (just to be clear) doesn't mean I stop playing golf just because it's winter. I'm not just a fair weather golfer. But with dark evenings I can't play during the week and sometimes the weather is just a bit too 'orrible :)

So it'll probably be 8 months of golf, golf, golf and 4 months of golf, railway, golf, railway. I reckon the scenery is going to take a lot longer than the track. There's more of it, it requires skills I definitely don't possess and it can't be hurried. I might get the wiring and ballasting done over summer as it would be nice for next autumn to be the start of 'the scenery phase' but we shall see. I'm doing this as a long term hobby so am hoping I've got at least a couple of years work on this.
User avatar
andruec
Posts: 146
Joined: Sun Nov 15, 2020 11:01 am
Location: South Northants
Contact:

Re: Big Geom - An adventure in N Gauge

#4

Post by andruec »

The inclines have arrived along with the last of the curves. Here we see the inclines in place (not fixed yet) and in the distance the completed Mezzanine section (still not at the final height). Also note the weights pinning down the track on the right. I found a joint with an errant fishplate this morning so had to relay that stretch. I'm amazed that I never noticed it before.

Image

I prefer Callaway Supersoft golf balls for all my needs :)

This weekend I need to cut the final elevated section which will be a challenge. It's basically a 'UU' shape. Each outer arm carries four sidings (you can see part of a mock-up under the paper on the left). The inner arms go down the central incline to the mezzanine section. It hides the diamond and track leading to it but as the track comes back into view I want embankments. The trick will be cutting the inner section for the embankments but I think I can 'make good' with polystyrene if I have to.
User avatar
Walkingthedog
Posts: 4937
Joined: Thu Oct 04, 2018 5:51 pm
Location: HAZLEMERE, BUCKS.
Contact:

Re: Big Geom - An adventure in N Gauge

#5

Post by Walkingthedog »

Why not hold the track down with drawing pins until you are 100% sure things are right. Even then I bet you find someting is wrong.
Nurse, the screens!
User avatar
andruec
Posts: 146
Joined: Sun Nov 15, 2020 11:01 am
Location: South Northants
Contact:

Re: Big Geom - An adventure in N Gauge

#6

Post by andruec »

Walkingthedog wrote: Thu Dec 31, 2020 3:41 pm Why not hold the track down with drawing pins until you are 100% sure things are right. Even then I bet you find someting is wrong.
When I was a young nipper I was putting up decorations with drawing pins and I pushed one through the cap and into my thumb. It wasn't a serious injury but it gave me a nasty shock and since then I've avoided the things.

I only leave the weights on while the glue is drying. Takes about a day although I have to move the boxes half way through to ensure air gets to all the glue. Anyway due to a surprising increase in prowess over the last year or so I find that I have a lot of boxes of golf balls just lying around.

If I can't lose them on the golf course then I ought to use them for something...

:D
User avatar
Walkingthedog
Posts: 4937
Joined: Thu Oct 04, 2018 5:51 pm
Location: HAZLEMERE, BUCKS.
Contact:

Re: Big Geom - An adventure in N Gauge

#7

Post by Walkingthedog »

Up to you but I think gluing is what you do after everything is OK. Are you going to ballast the track?
Nurse, the screens!
User avatar
andruec
Posts: 146
Joined: Sun Nov 15, 2020 11:01 am
Location: South Northants
Contact:

Re: Big Geom - An adventure in N Gauge

#8

Post by andruec »

Walkingthedog wrote: Thu Dec 31, 2020 4:38 pm Up to you but I think gluing is what you do after everything is OK. Are you going to ballast the track?
Yes, but that's going to be after I've got the wiring done. I was originally going to use double sided tape but that meant lifting the track and disrupted some of the joints. In the end I found that the track would stay pretty much where it was put for testing purposes - it wasn't glued when I did my 9v battery test runs.

I've only had to pull two sections up and one was because of a routing mistake the other was that fishplate. In both cases the track came up pretty easily. That might be because I glue it the way people usually glue ballast. I wet the track then dribble glue along the centre line. That fixes it well enough but probably not so well as lifting it up and putting glue underneath.
User avatar
Walkingthedog
Posts: 4937
Joined: Thu Oct 04, 2018 5:51 pm
Location: HAZLEMERE, BUCKS.
Contact:

Re: Big Geom - An adventure in N Gauge

#9

Post by Walkingthedog »

The reason I suggested pinning the track is because when you ballast you can remove them. You will be glueing the track down twice by glueing it now. Pins will also allow you to move the track about a bit if necessary and sods law says you will have to move it as you have already discovered. Anyway each to his own as long as you get the correct end result. I’ve been laying track for 60 years and have always had to shift things about.
Nurse, the screens!
User avatar
yelrow
Posts: 954
Joined: Thu Oct 04, 2018 6:54 pm
Location: Burgundy, France
Contact:

Re: Big Geom - An adventure in N Gauge

#10

Post by yelrow »

Dead against gluing. Your first layout, is never the finished article, and needs constant tinkering with. Glue does not allow for change. Pin/ screw it. Much simpler. I have only been laying track for 55 years though, so a bit to catch up.
Post Reply

Who is online

Users browsing this forum: No registered users and 6 guests