Circularium

Dedicated area to show the community your model railway projects.
Post Reply
User avatar
andruec
Posts: 146
Joined: Sun Nov 15, 2020 11:01 am
Location: South Northants
Contact:

Circularium

#1

Post by andruec »

So the nights are drawing in and evening golf is no longer practical. That means the start of a new modelling season. It's been a long time since I last posted here but no, I didn't abandon the hobby. I fixed the problem locos I had (no track relaying needed) and at the end of last season moved all my rolling stock onto the board. One curious consequence of this was that the occasional breakaway stopped. My assumption is that since I don't shunt and have left the rakes fully assembled all summer it allowed the couplings to 'settle in'.

Image
A view of Wilf's Junction (named in honour of my late father) looking toward the triple exit tunnel. The mainline is a large outer loop and inner figure of 8. Wilf's Junction can convert the layout from a single run to two separate runs.

A couple of members expressed concern about track/board expansion over summer and I'm pleased to report that there was no evidence of it. Least-wise the track remained happily in place. A couple of fishplates decided that they couldn't be bothered to conduct electricity any longer but that easy enough to fix by adding more droppers.
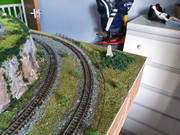
Image
Beekle's Memorial Stone. The right-hand track is the approach to Wilf's Junction, the left-hand track is the exit from The Long Tunnel.

As you can see the track has been ballasted. The rails have also been painted. I'm still not 100% happy with the ballast but I think it looks pretty good. I re-did Wilf's Junction with smaller, lighter stones then painted them. I think my Dad would have liked it.
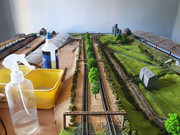
Image
A view down Access Way. This is now tree-lined and has gantries. It's called Access Way because it's the only way to get from the sidings to/from the mainline.

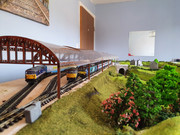
I also ordered two 'covers' for my sidings. They were to keep dust off parked locos and provide some interest to the layout. They were custom made to my design and assembled by me. It's MDF with acetate for the roofs. It turns out that even UHU doesn't stick acetate to wood very well so the roofs are fragile. Still the effect works reasonably well.
Image
The North Shed. From right to left, Blue Gorgeous, Little Bertha, Blue Horror.

The above is an old shot so it's not showing Queen Elizabeth who was away for repairs. But she's back now.
Image
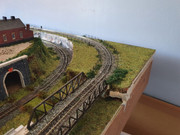
Far Corner. Not a great deal to see here but the fencing looks nice and I repurposed a tunnel mouth to act as the entrance to a pedestrian tunnel.
Image
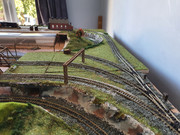
The lower entrance of Access Way. The scene of several incidents concerning my class 43 Miss Behaviour. As mentioned above I was able to fix her and now she's happy to make her way down the ramp. This year I hope to add more interest to this area but I'm not quite sure what should go there.
Image
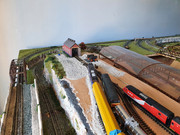
The North Shed. From left to right, DRS Bertha, Big Bertha, Miss Behaviour.

Projects for this season:
* Install turnouts on the North Shed entrance (currently in progress)
* Install turnouts on the South Shed entrance (might be problematic)
* Install signals around the board.
* Complete the South Siding embankment.
* Complete the second major area of scenery (in between The North Shed and Access Way. This is hoped to be a cutting through a forest with a stream running down the side of Access Way leading to a pond under the double bridge at the bottom of Access Way.
* Complete siding furniture. Various bits of stuff (like barrels, rolls of wire, pallets) and palisade fencing all around.

I reckon that ought to keep me busy until next spring ;)

I'll leave you with Miss Behaviour strutting her stuff.
Mountain Goat
Posts: 1537
Joined: Fri Oct 05, 2018 12:57 pm
Contact:

Re: Circularium

#2

Post by Mountain Goat »

Very nice. I like the scenery. :)
Budget modelling in 0-16.5...
User avatar
Chops
Posts: 1098
Joined: Sat Oct 06, 2018 8:11 am
Location: El Paso, Texas USA
Contact:

Re: Circularium

#3

Post by Chops »

Fantastic views. I am glad earlier nights have driven you off the golf course, for our benefit. :) The Miss Behavior video really shows off the dramatic effects of cuts, bridges, and elevations.
User avatar
andruec
Posts: 146
Joined: Sun Nov 15, 2020 11:01 am
Location: South Northants
Contact:

Re: Circularium

#4

Post by andruec »

Glad you like it. Yes, I love the cutting by the stone embankment. Still not sure quite how it came out that well. Wilf's Junction is pretty good as well. I still haven't managed to achieve the 'natural rock' look I really wanted:

Image

but I think I've got 'a group of workers with some dynamite' sorted. This winter's stream and pond will be fun. I want the stream to look like it's running relatively fast with rocks in it and the two bridges have supports which I'd like to have ripples around in the pond. It's something I've never tried before.

Today I've fixed, plugged in and programmed the last of the North Siding turnout motors. I've also taken delivery of the signals and mimic board so those might go in next weekend. I'd make a start today but spending yesterday under my board (I decided that was the best place to site the motor controllers) has left me with aching leg and lower back muscles. No injury but clearly I overdid it a bit sitting on my haunches for so long. For some reason one of the turnouts took a lot of throw configuration which meant going crawling under and out and several times. Oh the sacrifices we make for our hobby :)
Nick8873
Posts: 24
Joined: Sun Dec 01, 2019 7:33 pm
Contact:

Re: Circularium

#5

Post by Nick8873 »

Hi ur rock face looks amazing I'm trying to create a similar look using rock moulds what did you make ur rack face out of?
Nick
User avatar
andruec
Posts: 146
Joined: Sun Nov 15, 2020 11:01 am
Location: South Northants
Contact:

Re: Circularium

#6

Post by andruec »

Oh, just for clarity that rock face in the post above this one is not one of mine. That's the kind of thing I was really aiming for but didn't quite achieve. Still, if you like what I did manage here's how I did it:

Image

Modroc for the basic shape.
The top baseboard is ~50mm above the main baseboard (I model in n-scale) and I draped overlapping sections of Modroc along its length, pretty much like a curtain. Each section was a short length of the Modroc so about 70mm wide. I didn't use any kind of former. The pieces are anchored at the top (by their own glue) but allowed to just touch the bottom and hang as they want, albeit joined to their neighbours. No attempt was made to smooth them out or keep them vertical and indeed a slightly rumpled look is beneficial.

There are actually two layers of Modroc. The second layer is put over the first layer while the first layer has only just started to stiffen. I did it in sections so that I could support the first layer as I rubbed the second into it to help them bond. The second layer sections overlap the gaps between the first layer. Again no particular care taken to achieve a smooth or vertical finish.

Wall Filler Added
I smeared ready made wall filler (Ronseal for what it's worth) along the cutting. No attempt to keep it smooth and a few lumpy bits seem to add real 'rockiness' to the whole thing. For some reason having the lumpy bits at a shallow angle to the horizontal seems to work really well.

Painting
The paints used are 'a light grey', 'sand colour', burnt umber and white. I also used a black wash. The light grey went down first as a base coat. It should be thick enough to turn the face a fairly uniform grey but only just. Then I put on the black wash to highlight the crevices.

Now the fun part :)

The remaining colours are dry bushed on. The way I did it was very economical in paint but not so nice for the paint brush. Put a little bit of white paint on the end of a small brush and dab it onto the wall at the centre of two or three lumpy bits. With a small amount on the brush three or four lumpy dabs should take most of the paint off the brush. Now go round each lump spreading the small amount of paint around. You can get quite physical doing this (which is why you don't want to use your favourite fine paint brush, lol). The idea is to leave the rock looking a badly painted grey (ie; as if someone tried to cover the grey with white but didn't put enough coats on). Once dry repeat with the sand. I found it helped to let the sand be better at covering the white than the white covered the grey if that makes sense. The centre of the lumps should be where the sand covers the white best of all.

Lastly go round with the burnt umber (still very sparingly) adding highlights to horizontal surfaces where you can imagine soil gathering.

Now the magic happens. Dab small amounts of PVA (or glue of your choice) on horizontal and sloped surfaces. Not everywhere but here and there. blow or drop or throw scatter onto those places. If you have a long slope then a long run of scatter can be used but for most of the face you just want a bit here and there. What you should find is that the scatter brings the face to life.

Last stage. Run PVA along the bottom of the face and cover the join with whatever you use for bushes/hedges. I only had a few gross gaps to fill. The rest could be covered by bits of plaster (to represent rocks) or ballast from the track that runs alongside.

It sounds a bit involved, complicated and tedious (not my cup of tea at all) but I actually found the dry painting phase to be therapeutic. It's one of those things where you can just 'zone out' your mind and you're finished before you know it.
User avatar
andruec
Posts: 146
Joined: Sun Nov 15, 2020 11:01 am
Location: South Northants
Contact:

Re: Circularium

#7

Post by andruec »

I think my faces work from a distance and because it's N-scale I can get away with a lot. People don't generally get too close looking for detail because they know it's too small. I'm not sure that my results would be good enough for larger scales where people like to get in close and personal :)
Post Reply

Who is online

Users browsing this forum: No registered users and 1 guest