I do hope there will be a horsemeat shop at one end of the layout.
LUMSDONIA
-
GeoffAlan2
- Posts: 89
- Joined: Sat Oct 06, 2018 1:57 pm
- Contact:
Re: LUMSDONIA
Same to you timberwolf.
I do hope there will be a horsemeat shop at one end of the layout.
I do hope there will be a horsemeat shop at one end of the layout.
- TimberSurf
- Posts: 25
- Joined: Wed Oct 17, 2018 10:58 pm
- Location: Wrexham
- Contact:
Re: LUMSDONIA
No clue what you mean by the horse reference GeoffAlan2 
Almost forgot, the xmas card was based on a diorama that I have built. It was my entry into a forum competition "two re-purposed buildings".
So I made an old windmill into a holiday let, however, I intend to get the Windmill working eventually and the diorama will fit into an appropriate hole and be integrated into my final layout.

Animated Windmill Diorama in OO : How to build a working Windmill scene Part 1
When I have the sail rotating I will make part 2
Almost forgot, the xmas card was based on a diorama that I have built. It was my entry into a forum competition "two re-purposed buildings".
So I made an old windmill into a holiday let, however, I intend to get the Windmill working eventually and the diorama will fit into an appropriate hole and be integrated into my final layout.

Animated Windmill Diorama in OO : How to build a working Windmill scene Part 1
When I have the sail rotating I will make part 2
Re: LUMSDONIA
Diesels on a turntable. 
I hope the gunpowder van was empty?
Glencairn
I hope the gunpowder van was empty?
Glencairn
To the world you are someone. To someone you are the world
I Cannot Afford the Luxury of a Negative Thought.
I Cannot Afford the Luxury of a Negative Thought.
- TimberSurf
- Posts: 25
- Joined: Wed Oct 17, 2018 10:58 pm
- Location: Wrexham
- Contact:
Re: LUMSDONIA
Hi Glencairn (wrong forum!  )
)
If you remember the story , "Guy" was to be stabled in the engine shed overnight for safety
  !
!
Better than being parked next to 600 Tons of Oxygen! The only access to the engine shed is via the turntable.

If you remember the story
Better than being parked next to 600 Tons of Oxygen! The only access to the engine shed is via the turntable.
Re: LUMSDONIA
I remember it well. 
I shipped it off to Norway.
Glencairn
I shipped it off to Norway.
Glencairn
To the world you are someone. To someone you are the world
I Cannot Afford the Luxury of a Negative Thought.
I Cannot Afford the Luxury of a Negative Thought.
- TimberSurf
- Posts: 25
- Joined: Wed Oct 17, 2018 10:58 pm
- Location: Wrexham
- Contact:
Re: LUMSDONIA
So just to complicate my life further, to add to the many workbench projects currently on the go, I have now embarked on the third module of my layout. It is not a contiguous module, just a random one, but a highly complex build, so I am doing it now, in anticipation of incorporating it into the grand scheme when I get a room/house big enough to accommodate the final layout!
So, first of all, you need to understand my love of bridges, second the layout was always designed to be two levels to allow for as many bridge/tunnels as possible. Having seen many exhibition and Youtube examples of a layout section that is much lower than the main surface, I decided I should have one. It will be incorporated in the final design later (I will MAKE it fit! ) but at present. will be standalone.
It will consist of a sandstone cliff on the left, with a canal by its side at minus 300mm level, a road running parallel to it and a river slightly lower defining the bottom of the valley, with the opposite side of the valley being a gentle slope. Over these will be a road stone arched bridge (completely scratch built) at a minus 200mm level, emanating from a tunnel in the cliff, then winding up the slope back up to board level (0mm) on the right.
A modified bow steel bridge (half kit half scratch) will cross at board level from the cliff edge to midway and a further two sets of lower arch steel bridges will span the other half to meet the right board. A completely bespoke scratch build 'Cable-stayed' bridge will span the two boards with a small overlap at each end, at a 100mm level and will be 1,200mm long! (yes, 4 feet long!

So, first of all, you need to understand my love of bridges, second the layout was always designed to be two levels to allow for as many bridge/tunnels as possible. Having seen many exhibition and Youtube examples of a layout section that is much lower than the main surface, I decided I should have one. It will be incorporated in the final design later (I will MAKE it fit!
It will consist of a sandstone cliff on the left, with a canal by its side at minus 300mm level, a road running parallel to it and a river slightly lower defining the bottom of the valley, with the opposite side of the valley being a gentle slope. Over these will be a road stone arched bridge (completely scratch built) at a minus 200mm level, emanating from a tunnel in the cliff, then winding up the slope back up to board level (0mm) on the right.
A modified bow steel bridge (half kit half scratch) will cross at board level from the cliff edge to midway and a further two sets of lower arch steel bridges will span the other half to meet the right board. A completely bespoke scratch build 'Cable-stayed' bridge will span the two boards with a small overlap at each end, at a 100mm level and will be 1,200mm long! (yes, 4 feet long!

- JohnSmithUK
- Posts: 185
- Joined: Fri Oct 05, 2018 12:12 pm
- Location: South Shields
- Contact:
Re: LUMSDONIA
This I am looking forward to the building of, that cable stayed bridge will be the size of the Dartford Crossing.
- TimberSurf
- Posts: 25
- Joined: Wed Oct 17, 2018 10:58 pm
- Location: Wrexham
- Contact:
Re: LUMSDONIA
Tha top bridge is mainly made from aluminium, materials have been bought and a start made.
The steel left steel bridge, is half Kibri parts and half scratch build and is being assembled.
Stone bridge has one side completely covered.
I bought two canal boats from Craftline and am replacing the supplied prints for the sides with my own.I have cobbled together enough photo's to patch them together to use on both boats, but now need to trial and error print and fit to get the right scale!
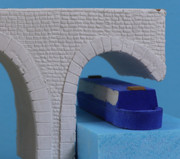
Checked the clearance and the canal and a tow path will fit under the bridge (I left the end too long to enable integration into the cliff), I was a bit concerned, as the Crafline are broad beam, not narrow boats!
So here are some views of the texture roller bricks. The corner stones are laid on after and grooved. This is the back (unseen side) that serves as the first go, I have yet to tackle the other side. I am not sure I like the corner sides sticking out proud (it was a quick fix to lay DAS on, after the sides had been applied).
I have yet to decide if I can stomach routing out a rebate into the brick after laying the brick, although I could do it by cutting when soft when I lay the bricks on the other side.
Yes I know the bricks ain't very even, but this was a test. Obviously rolling the pattern is good on a flat surface, but moving it to the bridge, inevitably allows stretch and misshaping before it lands! I am not sure that rolling on the bridge won't produce an undulating surface!


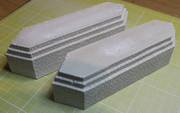
The pillar bases are cast in a hardboard box, holding a gun sealant silicon mould of a Linka master. They turned out well!

The steel left steel bridge, is half Kibri parts and half scratch build and is being assembled.
Stone bridge has one side completely covered.
I bought two canal boats from Craftline and am replacing the supplied prints for the sides with my own.I have cobbled together enough photo's to patch them together to use on both boats, but now need to trial and error print and fit to get the right scale!
Checked the clearance and the canal and a tow path will fit under the bridge (I left the end too long to enable integration into the cliff), I was a bit concerned, as the Crafline are broad beam, not narrow boats!
So here are some views of the texture roller bricks. The corner stones are laid on after and grooved. This is the back (unseen side) that serves as the first go, I have yet to tackle the other side. I am not sure I like the corner sides sticking out proud (it was a quick fix to lay DAS on, after the sides had been applied).
I have yet to decide if I can stomach routing out a rebate into the brick after laying the brick, although I could do it by cutting when soft when I lay the bricks on the other side.
Yes I know the bricks ain't very even, but this was a test. Obviously rolling the pattern is good on a flat surface, but moving it to the bridge, inevitably allows stretch and misshaping before it lands! I am not sure that rolling on the bridge won't produce an undulating surface!


The pillar bases are cast in a hardboard box, holding a gun sealant silicon mould of a Linka master. They turned out well!

Who is online
Users browsing this forum: Google [Bot] and 4 guests
