Neptune Street
- Walkingthedog
- Posts: 5052
- Joined: Thu Oct 04, 2018 5:51 pm
- Location: HAZLEMERE, BUCKS.
- Contact:
Re: Neptune Street
My old OO layout didn’t have a station and I only had about 6 coaches which were rarely used. My O gauge layout is just wagons and small locos.
Nurse, the screens!
Re: Neptune Street
Too windy today to replace all the missing greenhouse glass, still if that’s the worst from the storms I’ll take it. So got some shed time over the last two nights.
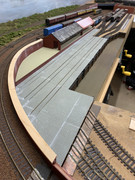
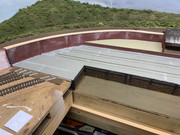
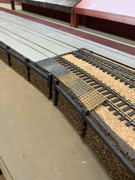
There doesn’t seem to be that much visual progress but laying the granite sets for the quayside and fish sheds seems to have taken an age, to the extent I got bored (again). But it’s done, seams filled and ready for a spray and weathering. From the test strip I think I’m favouring the grey, I don’t thing there’ll be enough contrast with the quay wall if I go for ochre/brown.


There doesn’t seem to be that much visual progress but laying the granite sets for the quayside and fish sheds seems to have taken an age, to the extent I got bored (again). But it’s done, seams filled and ready for a spray and weathering. From the test strip I think I’m favouring the grey, I don’t thing there’ll be enough contrast with the quay wall if I go for ochre/brown.


Re: Neptune Street
Looking good Carl…….. I would tend to agree that a grey quayside would be a good contrast and properly easier to introduce different shades………. Cheers Richard
- bulleidboy
- Posts: 2394
- Joined: Thu Oct 04, 2018 6:30 pm
- Location: Basingstoke, Hants
- Contact:
Re: Neptune Street
The texture of the granite sets lends itself to a base colour (grey) with some random splotches of light ochre that have been rubbed into the sets with a cotton bud as that will feather the edges.
Then a good covering of a dark wash rubbed off with a rag to leave the grime in the depressions.
It's looking good by the way.
Then a good covering of a dark wash rubbed off with a rag to leave the grime in the depressions.
It's looking good by the way.
"Not very stable, but incredibly versatile." 
Re: Neptune Street
Thank you for the comments.
Steve - I’d noticed your method on your stonework, very effective, so I’ll be giving it a go.
The bit I’m fighting shy of is the water. On a test piece I’d tried a Chris Nevard method of PVA; it didn’t work for me, it dried milky - perhaps the wrong PVA. I guy in a local pub (sounds like the start of a joke ) who does seascape diaramas uses, and recommends, Modgepodge. I’ve seen the Heaton Lodge layout which uses resin, and then there’s the Woodland scenics products, which seems a tad more expensive than PVA. Decisions, decisions!
Steve - I’d noticed your method on your stonework, very effective, so I’ll be giving it a go.
The bit I’m fighting shy of is the water. On a test piece I’d tried a Chris Nevard method of PVA; it didn’t work for me, it dried milky - perhaps the wrong PVA. I guy in a local pub (sounds like the start of a joke
Re: Neptune Street
Carl, more tips...... have a look at Luke Towan on YouTube. He includes water in many of his dioramas and seems to favour resin with ripples added using Modgepodge. That will be the way I go when I eventually get round to finishing my rivers.
"Not very stable, but incredibly versatile." 
Re: Neptune Street
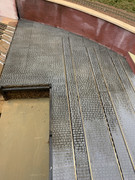
A bit of a start on weathering the granite sets tonight. A long way to go. Note to self - get the capstones finished!


Re: Neptune Street
The cobbles have come out quite well. Very effective.
"Not very stable, but incredibly versatile." 
Who is online
Users browsing this forum: No registered users and 5 guests