Harte's Mill I, now II
Harte's Mill I, now II
Retrieved this from the museum today; occasionally I actually try to do something that resembles reality. I have a long way to go,
but that's another story. In trying to pursue the ideal micro layout, by my definition one that could slide easily under a single small
bed, or into the back of my compact car, it dawned on me that creating a track plan composed either entirely, or mostly, of curves
would incur a most sinuous and interesting track plan well suited for the more dramatic formations of the American West.
This video, below, will be repurposed into a micro layout under a snowscape and barren trees, upon which to operate the HO scale
John Bull. Camden and Amboy Railway, 1835, late of New Jersey. So, from El Paso to New Jersey with a slight of hand.
https://youtu.be/0D9OSgz5xTg
Re: Harte's Mill I, now II
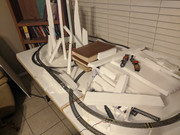
Nibbling away at it. Decided to call it "Mormon's Gulch," simply because the name popped in my head of reading a
Sherlock Holmes mystery conjoined to Utah. Not overly familiar with Utah, but I do know the geology is fairly dramatic,
in some spots. The pillars of foam are the skeleton of the volcanic plug, it shall become, whilst to the right will be a mesa.
Have it weighted down with books in the center, this to correct an upward warp that is being ameliorated by a lateral brace
below it to hold it down flat. I am using scrap Styrofoam and packing, some of it absconded from dumpsters behind the hardware
store, to build up the scenery forms.
As it sits right now, it's fairly light, but once plaster towels are overlaid for the surface subform, I fear it will become a two man
job to move about.
Re: Harte's Mill I, now II, Now Mormon's Gulch
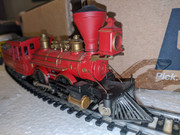
Making progress. Rekindled this vintage American Type by Pola, sturdy old beast, period correct. The diamond stack was an ash catcher for wood that was burned where wood was then plentiful. In terms of BTU's it would seem that compared to coal it would have been inferior.
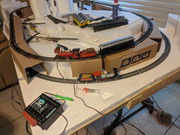
Trying to get the elevated tier sub road bed level and sturdy was a trick. It had to be three inches above the lower gradient to allow clearance, and the Styrofoam packing I attempted to utilize ended up being impossible to carve to the precise level, and generally difficult to work with. Bagging the whole lot for something else seemed to be the next best option, when I spied these cardboard mailing tubes whilst waiting in line at the post office. Three by three inches, they were perfect, and once installed the train ran splendidly.
Initially, I thought I would have three, perhaps four, trestles to span the lower tier. When I started scratch building the bents, it became quickly evident that the overall gap, created by the curvature above, would be far in excess of what would look believable. Those old trestles were pretty close together, and it would have been a awkward thirty or forty foot gap crossing the radius below. Thus, using the same Balsa I am now scratching up seven timber tunnel portals, instead. Necessity being the mother of invention.
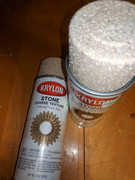
The final step in the puzzle was ground cover. Gluing the right shade of sand over the entire thing, over white plaster, would be a logistical nightmare. Living in the desert, there is no shortage of sand, but it is heavy and would need to be colorized to get the golden shade of sandy earth desired. Then, trying to apply the ground cover to the many vertical faces of Mormon's Gulch would require slopping on gallons of glue water, tipping the layout to various ninety degree angles, threatening to warp and damage everything.
Upon someone else's suggestion, I had used textured spray paint for simulated ballast on Henley, with reasonably good result. Spreading sand and glue upon rails and switches is something I've tried, and not enjoyed, at all, particularly if something had to be moved or adjusted. This tan colored texture spray paint ought to give a reasonably acceptable facsimile of the golden tan of the Utah desertscape.
Ultimately, Mormon's Gulch will slide neatly into the back of the hatchback, along with the subway layout, for transportation to model train
shows. It's always fun, or used to be, to show your stuff and chat with other model railheads.
Re: Harte's Mill I, now II
So, the upper tier seemed to want a number of trestles to pass over the lower tier, but this turned out not to be the case as the angle of the radii made trestling very awkward due to the length of the unsupportable span. So, instead of four trestles there will be four tunnels. There was this plaster timber tunnel portal, designed for two tracks, in the junk box, and it is quick work to scratch up a single track version. The bottom of the legs is a little uneven, but that is of no great concern as they will be trimmed to fit. Using this effort as a template, a jig will be built up to allow for a more rapid production.
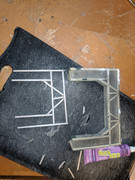
This tunnel will require a custom made portal, as it is quite narrow and slapping up against the canyon wall.
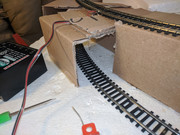

This tunnel will require a custom made portal, as it is quite narrow and slapping up against the canyon wall.

Re: Harte's Mill I, now II
This looking good!
Modelling post war LMS. DCC control via Roco z21 & multiMAUS
From cardboard to canyons
Using Woodland Scenics Plaster Cloth, so much easier to work with than the old days of fighting with plaster soak cloth, whilst the plaster hardens in minutes creating an iron hard coating, or worse, paper mache type strips slopping plaster everywhere. The cloth can be cut to size whilst dry, positioned, and gently moistened with brush or spray bottle in situ. To seal the pores with a smooth plaster finish, and to touch up areas, a damp brush does the trick easy as you please.
Re: Harte's Mill I, now II
Looks like you are really enjoying your self Chops, starting to look good with all the different contours.
Puddles
Puddles
It does not take me long to do five minutes work.
Nostalgia is not what it used to be.
Nostalgia is not what it used to be.
-
Bandit Mick
- Posts: 908
- Joined: Thu Oct 04, 2018 7:42 pm
- Contact:
Who is online
Users browsing this forum: No registered users and 3 guests
